Be yourself; Everyone else is already taken.
— Oscar Wilde.
This is the first post on my new blog. I’m just getting this new blog going, so stay tuned for more. Subscribe below to get notified when I post new updates.
Be yourself; Everyone else is already taken.
— Oscar Wilde.
This is the first post on my new blog. I’m just getting this new blog going, so stay tuned for more. Subscribe below to get notified when I post new updates.
Objectives:
1. Download and install Wireshark.
2. While doing certain activities on the internet and local network, use Wireshark to monitor the packet traffic that occurs.
3. After saving the packet traffic, examine them and look for data and information related to DNS, ICMP, and HTTP frames.
Equipment list: Computer, router, internet, and Wireshark software.
Notes and Observations: This assignment definitely took some time to work through. The analogy that our instructor used I think made a lot of since here. He said that this would be like dissecting a frog, you obviously see the organs inside the frog, but you would not have a clue what each one is. That is what this assignment felt like. There was a lot of data and information this program can show you, and I really don’t know what a huge portion of it was or what it meant. Thankfully he wanted us to focus on certain things instead of the whole picture of what this program can show us.
The first activity I did was to go to a website outside of my network. I went to ign.com . The second activity I did was releasing my IP address, the third was renewing my IP address. The fourth activity I did was a ping test with my router. The final activity I did was do a tracert for www.nus.edu.sg . I did this because I was curious to see what Wireshark would show when doing a tracert.
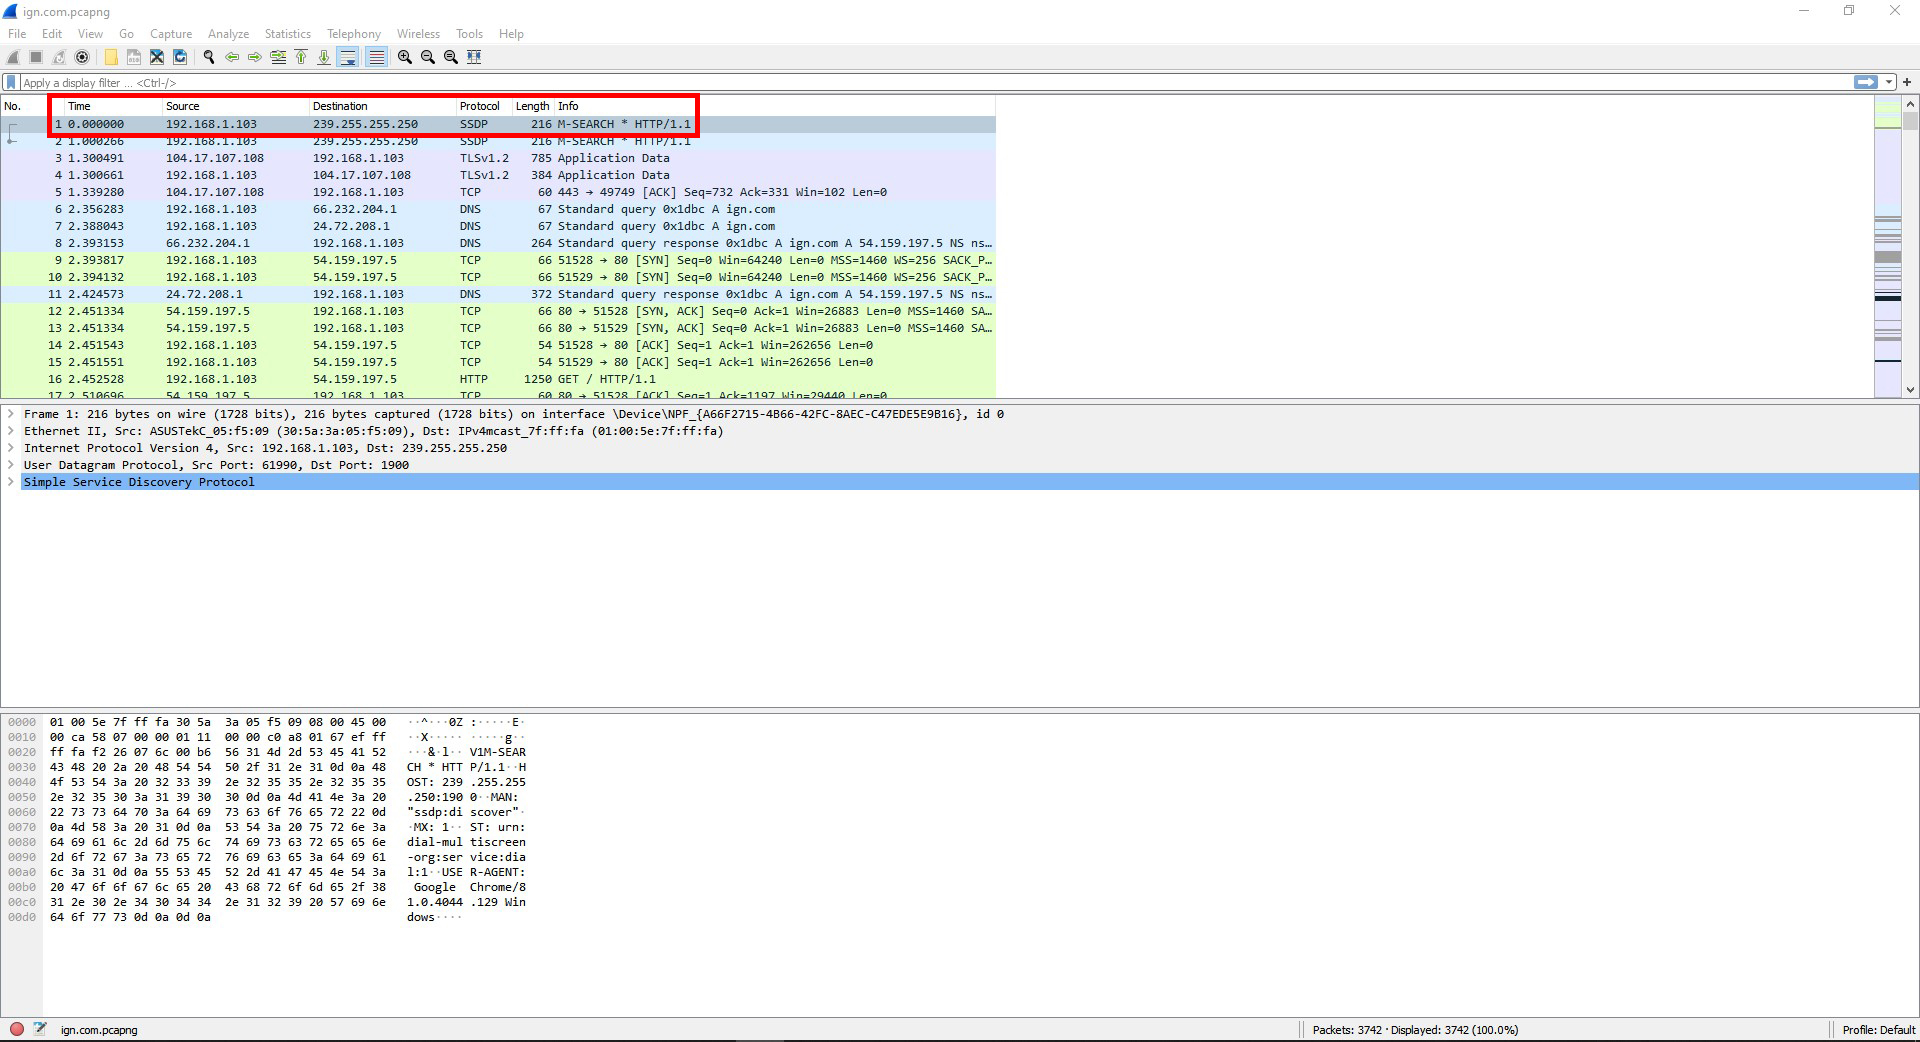
Question #1: In the top pane, select any packet to see its contents. Find the frame’s protocol type, length, source & destination address information.
The frame’s protocol type is a SSDP.
The length is 216.
The source address is 192.168.1.103 .
The destination address is 239.255.255.250 .
Question #2: Locate sequence numbers used by a TCP segment. What protocol type did you see? What sort of numbers did you find? What is the purpose of these numbers? View other protocol header information. List the field names and field values (the information contained inside) of one of the protocol headers such as IP, TCP, or UDP.
The protocol types I saw was TCP, IPv4, and Ethernet II.
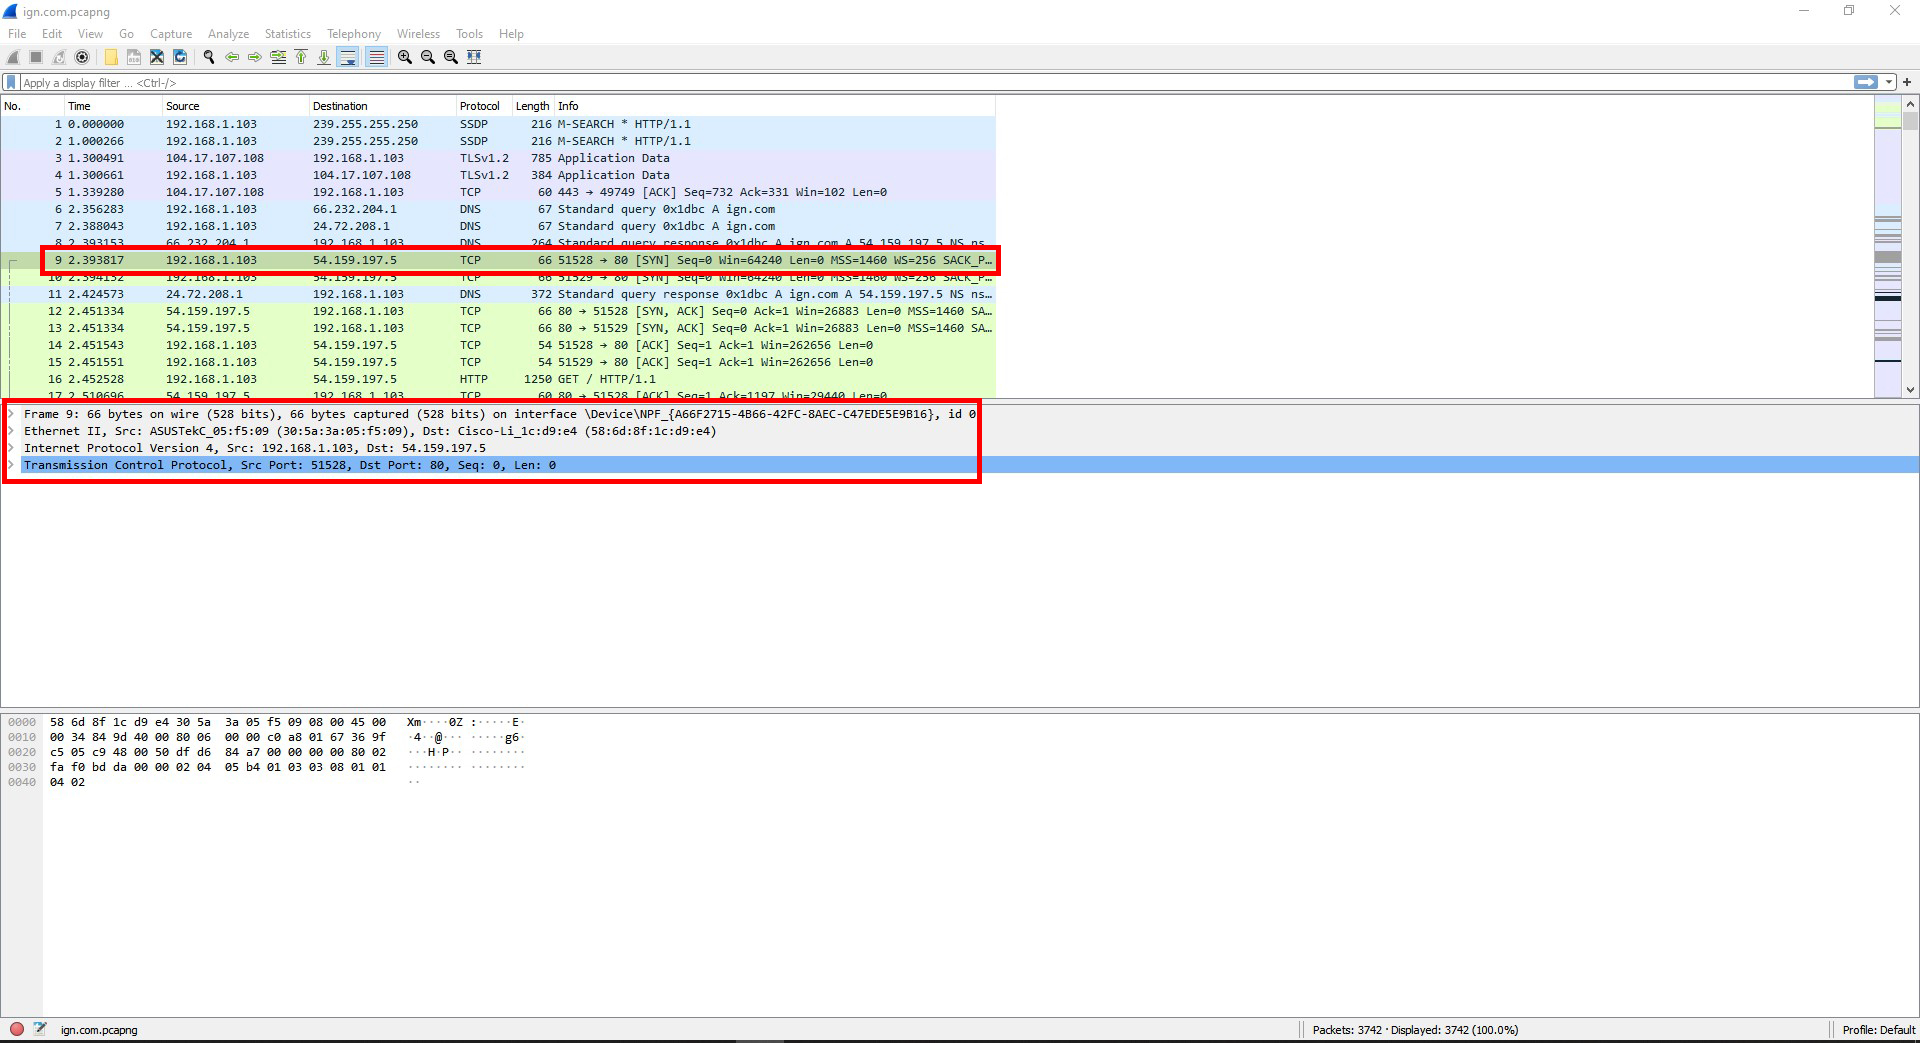
I found following numbers for the protocols:
TCP source and destination ports, sequence, and length.
IPv4 source and destination IP addresses.
Ethernet source and destination IP addresses.
The purpose of the port numbers is to show what ports were used for that packet and its datatype. The IP addresses show where the packet came from and where it was sent to.
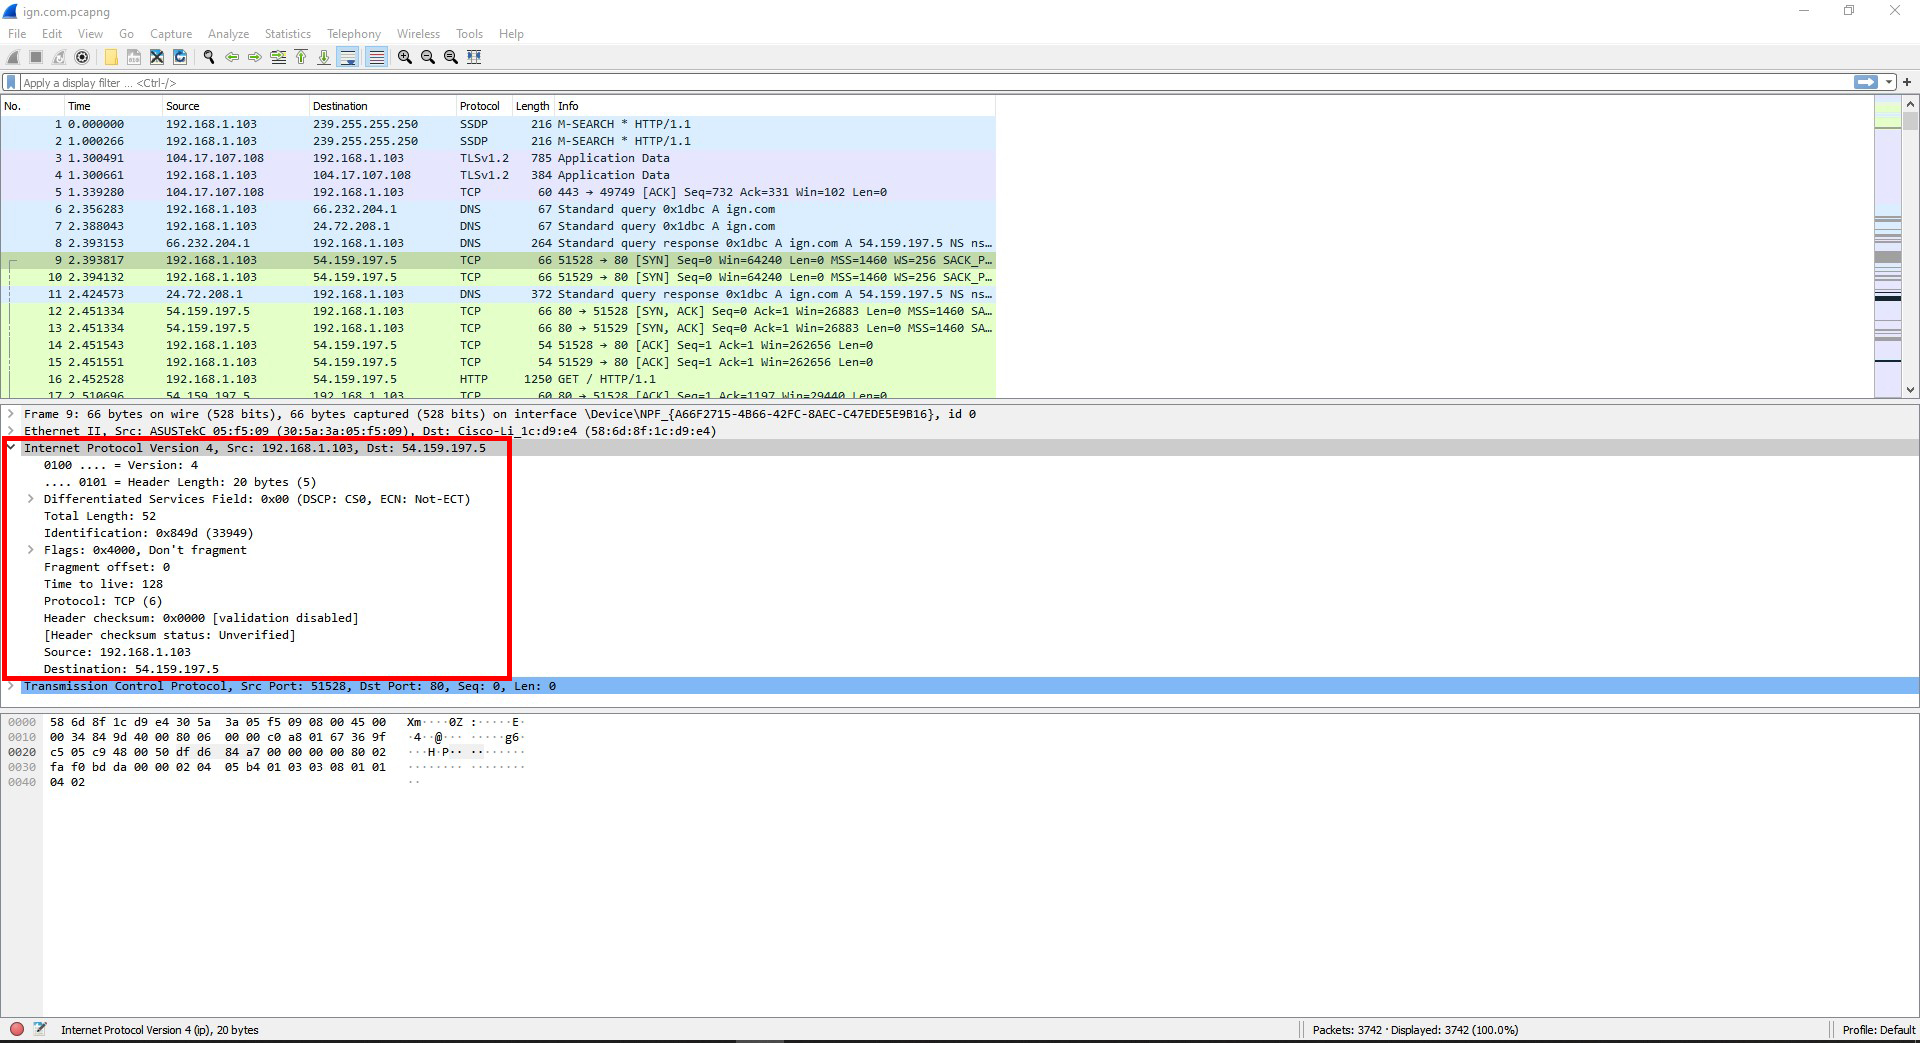
I looked in the IPv4 header and this is what I found:
Internet Protocol Version 4, Src: 192.168.1.103, Dst: 54.159.197.5
0100 …. = Version: 4
…. 0101 = Header Length: 20 bytes (5)
Differentiated Services Field: 0x00 (DSCP: CS0, ECN: Not-ECT)
Total Length: 52 Identification: 0x849d (33949)
Flags: 0x4000, Don’t fragment
Fragment offset: 0
Time to live: 128
Protocol: TCP (6)
Header checksum: 0x0000 [validation disabled]
[Header checksum status: Unverified]
Source: 192.168.1.103
Destination: 54.159.197.5
Question #3: In the top pane, choose to view another frame that has a different kind of protocol listed than the one you just viewed. Compare the information you found to the previous.
I clicked on a DNS packet and there was 2 things that were different. The 1st was that instead of having a TCP header, it had a UDP header. The 2nd thing was that it had a DNS query in it that the TCP frame did not have. The details for the IPv4 and Ethernet II were different also.
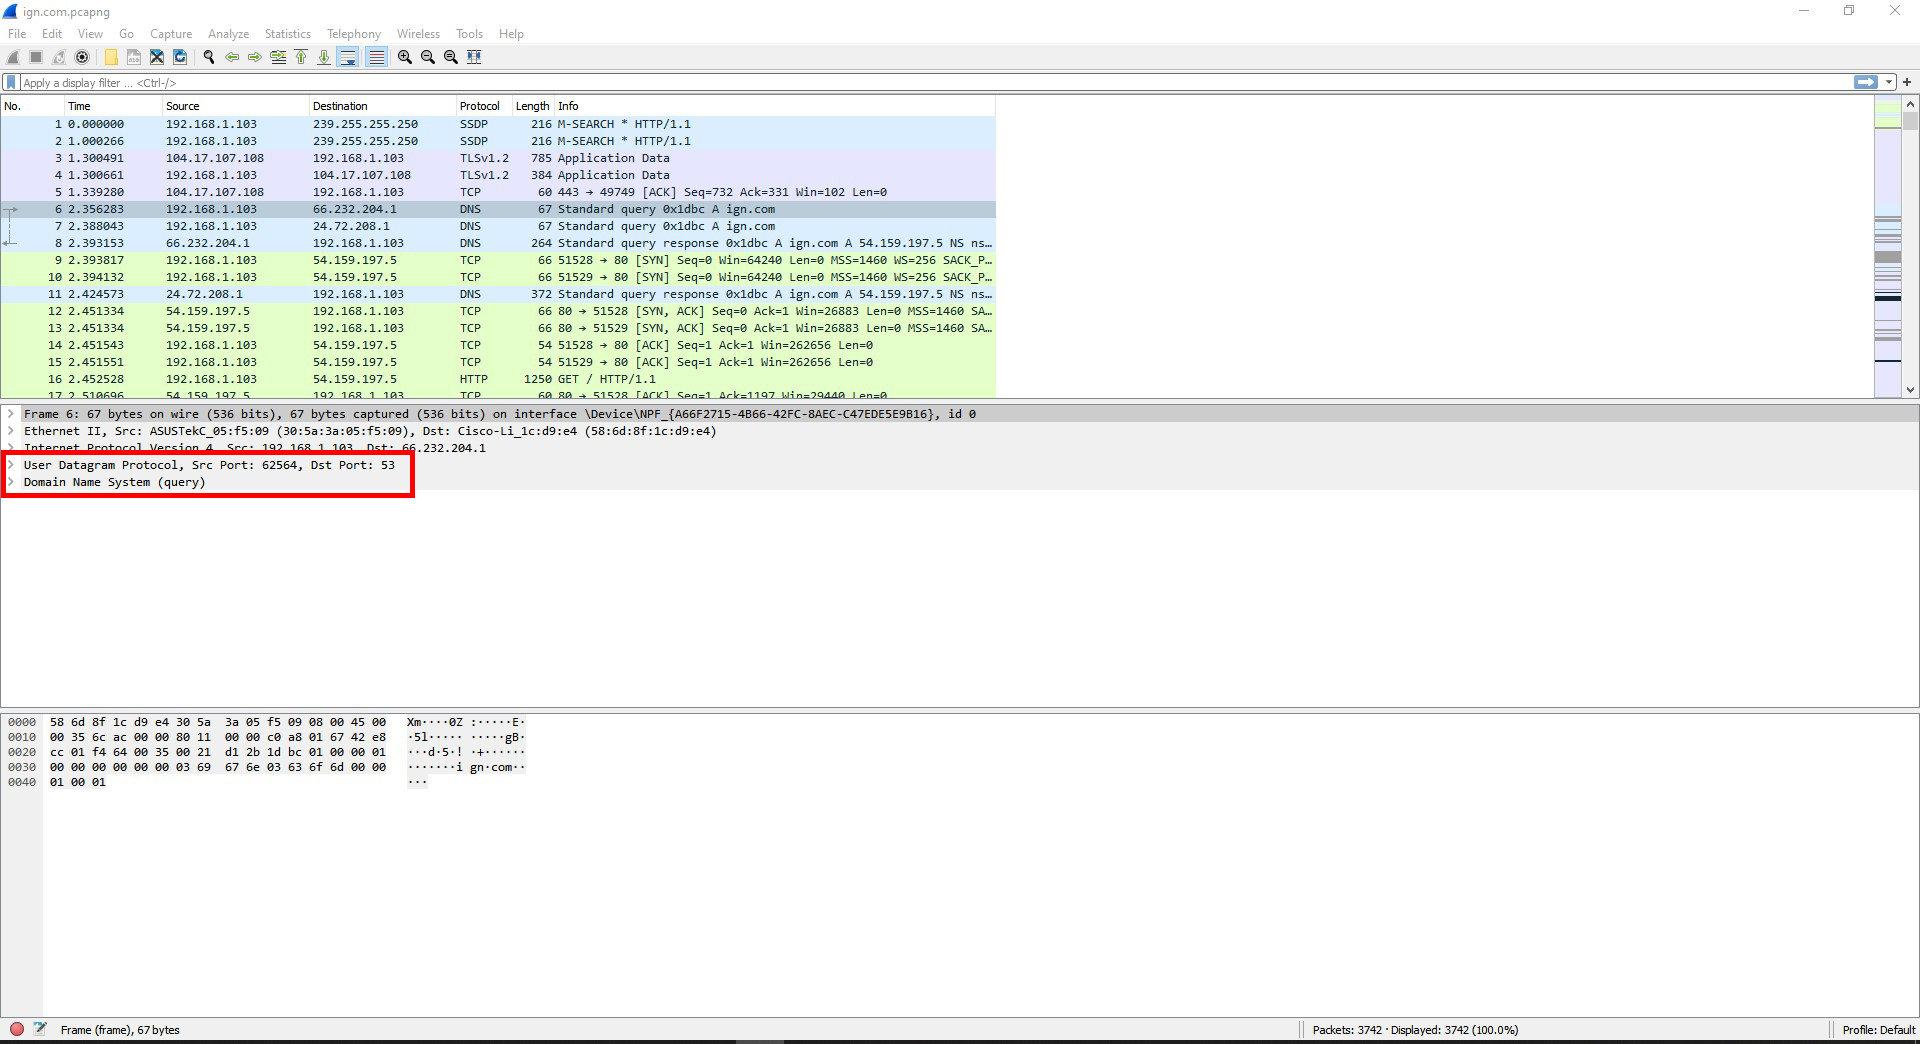
Question #4: Find a frame containing a DNS query. (If none is visible, try pinging a different website while recapturing packets.) What protocols are encapsulated in this frame? Which of these protocols is a transport layer protocol? What is DNS used for?
The protocols that were encapsulated were DNS, UDP, IPv4, and Ethernet II.
The protocol for the transport layer is UDP.
DNS is the protocol that links a domain name to the IP address for its website.
Question #5: Find a frame containing ICMP information. What protocols are encapsulated in this frame? Which layer does ICMP reside in? What do the ICMP initials mean and what is it used for?
The protocols encapsulated in this frame are ICMP, IPv4, and Ethernet II.
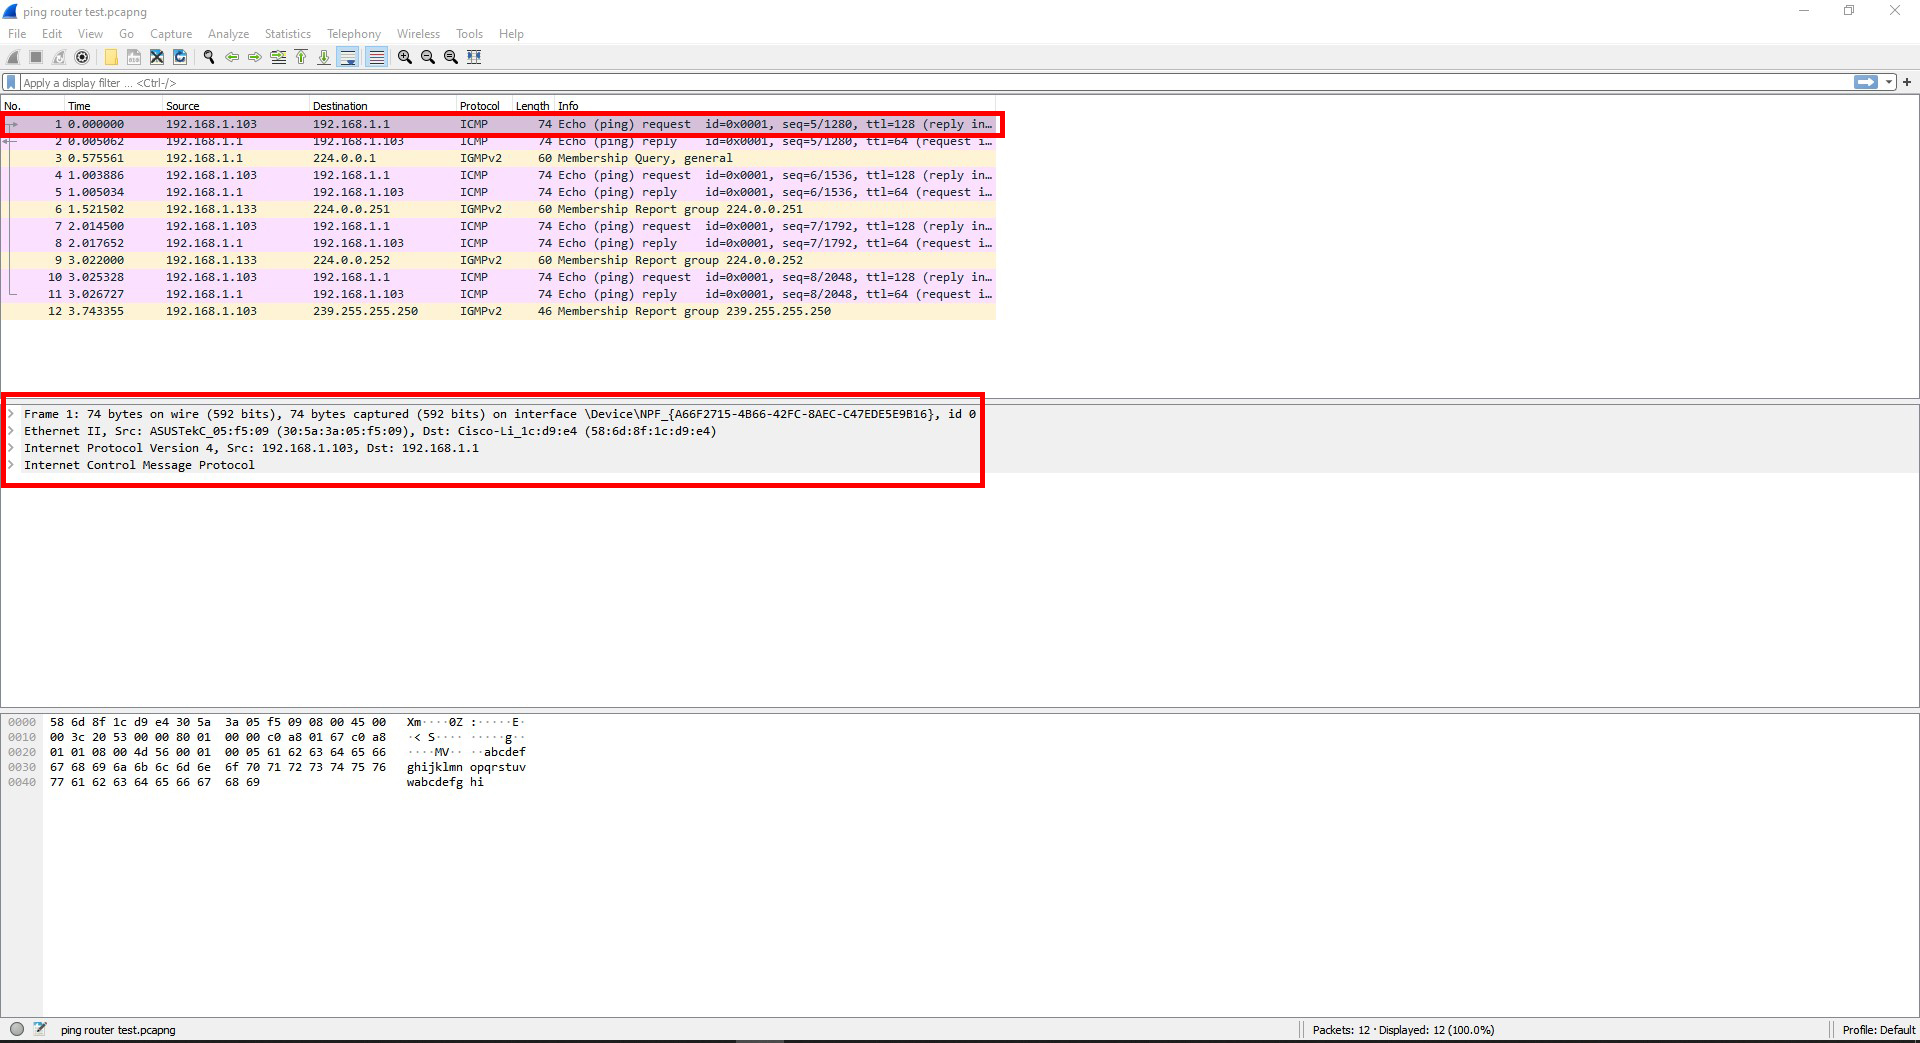
ICMP is on layer 3 (Network).
ICMP stands for Internet Message Control Protocol, and is used for reporting errors when data or packets have trouble getting to their intended device.
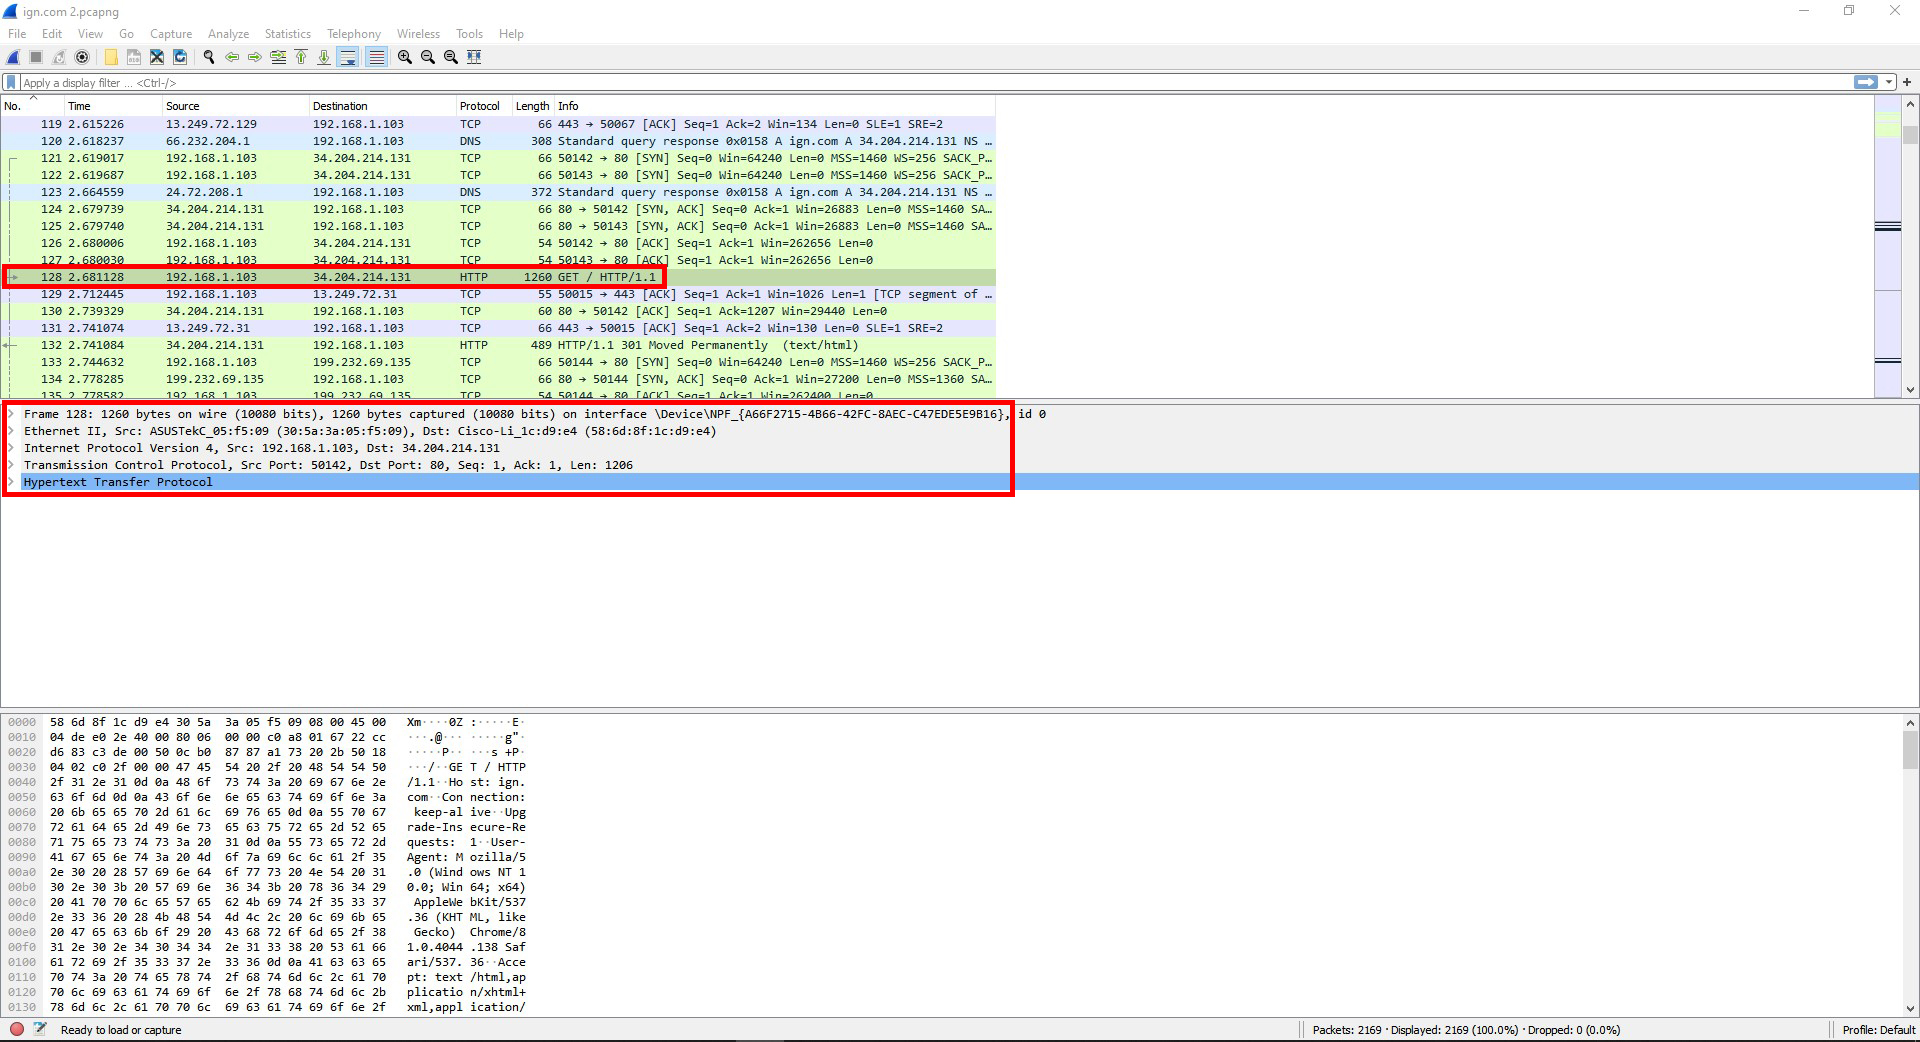
Question #6: Find frames containing HTTP information. Approximately how many frames did it take to download the web page? List the different protocols that are used. Note how many different protocols are working together to find and retrieve the information shown on one web page. All of this is going on behind the scenes with every page you see.
The frame I looked at took 2169 frames to download the webpage.
The different protocols involved were DNS, HTTP, SSL, TCP, TLS v1.2, and TLS v1.3.
This would be 6 different protocols being used just for the webpage.
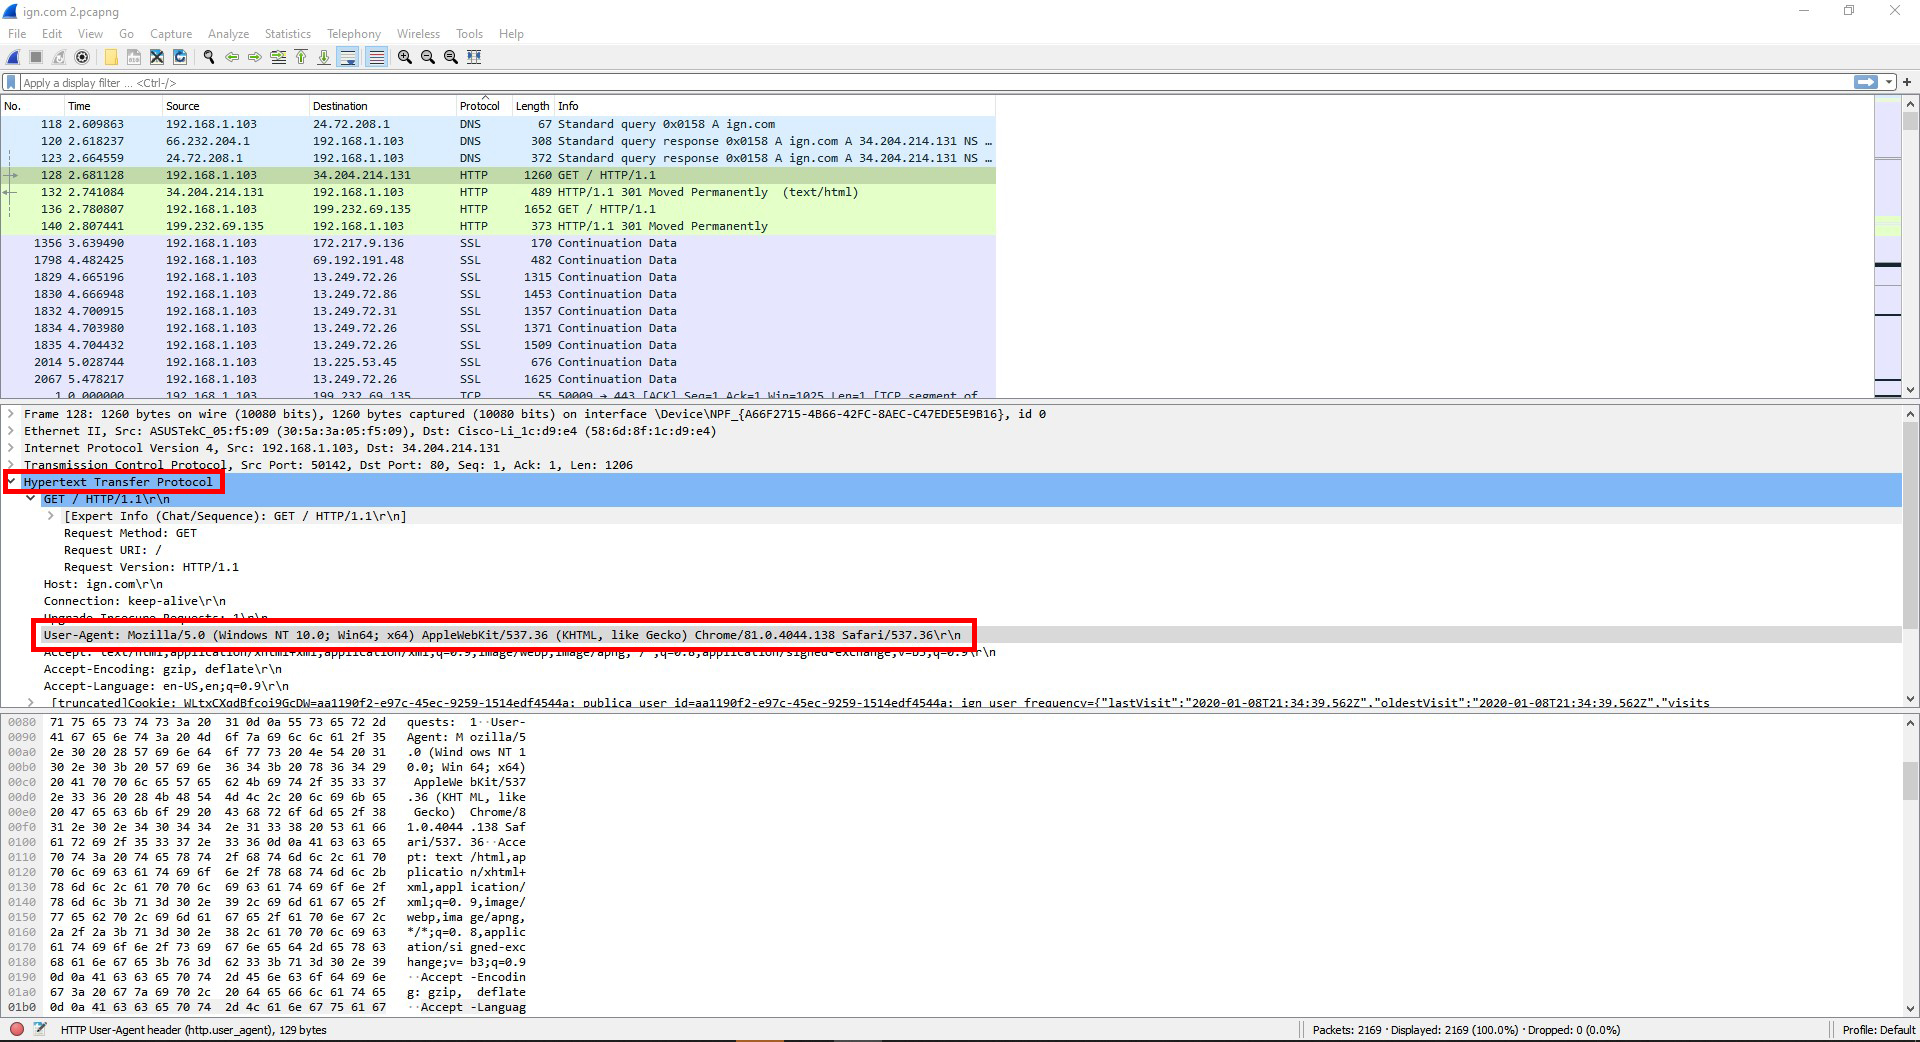
Question #7: Open the first frame carrying a HTTP GET request packet. What protocol headers do you see? List three field names from each of the headers. Within the HTTP header, find and record the User Agent information. Which layer does each of the protocols belong to?
The protocol headers are HTTP, TCP, IPv4, Ethernet II, and Frame 128.
For HTTP there is Host, Connection, and Upgrade-Insecure-Requests.
For TCP there is Source Port, Destination Port, and [Stream index]
For IPv4 there is Differentiated Services Field, Total Length, and Identification.
For Ethernet II there is Destination, Source, and Type.
For Frame 128 there is Interface id, Encapsulation type, and Arrival Time.
This was the information for the user information field:
User-Agent: Mozilla/5.0 (Windows NT 10.0; Win64; x64) AppleWebKit/537.36 (KHTML, like Gecko) Chrome/81.0.4044.138 Safari/537.36\r\n
HTTP is on layer 7 (Application).
TCP is on layer 4 (Transport).
IPv4 is on layer 3 (Network).
Ethernet II is on layer 2 (Data Link).
Frame 128 I’m guessing is on layer 1 (Physical)
Question #8: Open the first HTTP Response frame. Find the type of web server being accessed in this frame’s header.
It was an Apache server.

Question #9: Find a pair of frames that show an ARP request and an ARP response. Explain these frames and what they are doing.
The frames are showing the router and computer getting each other’s mac addresses.
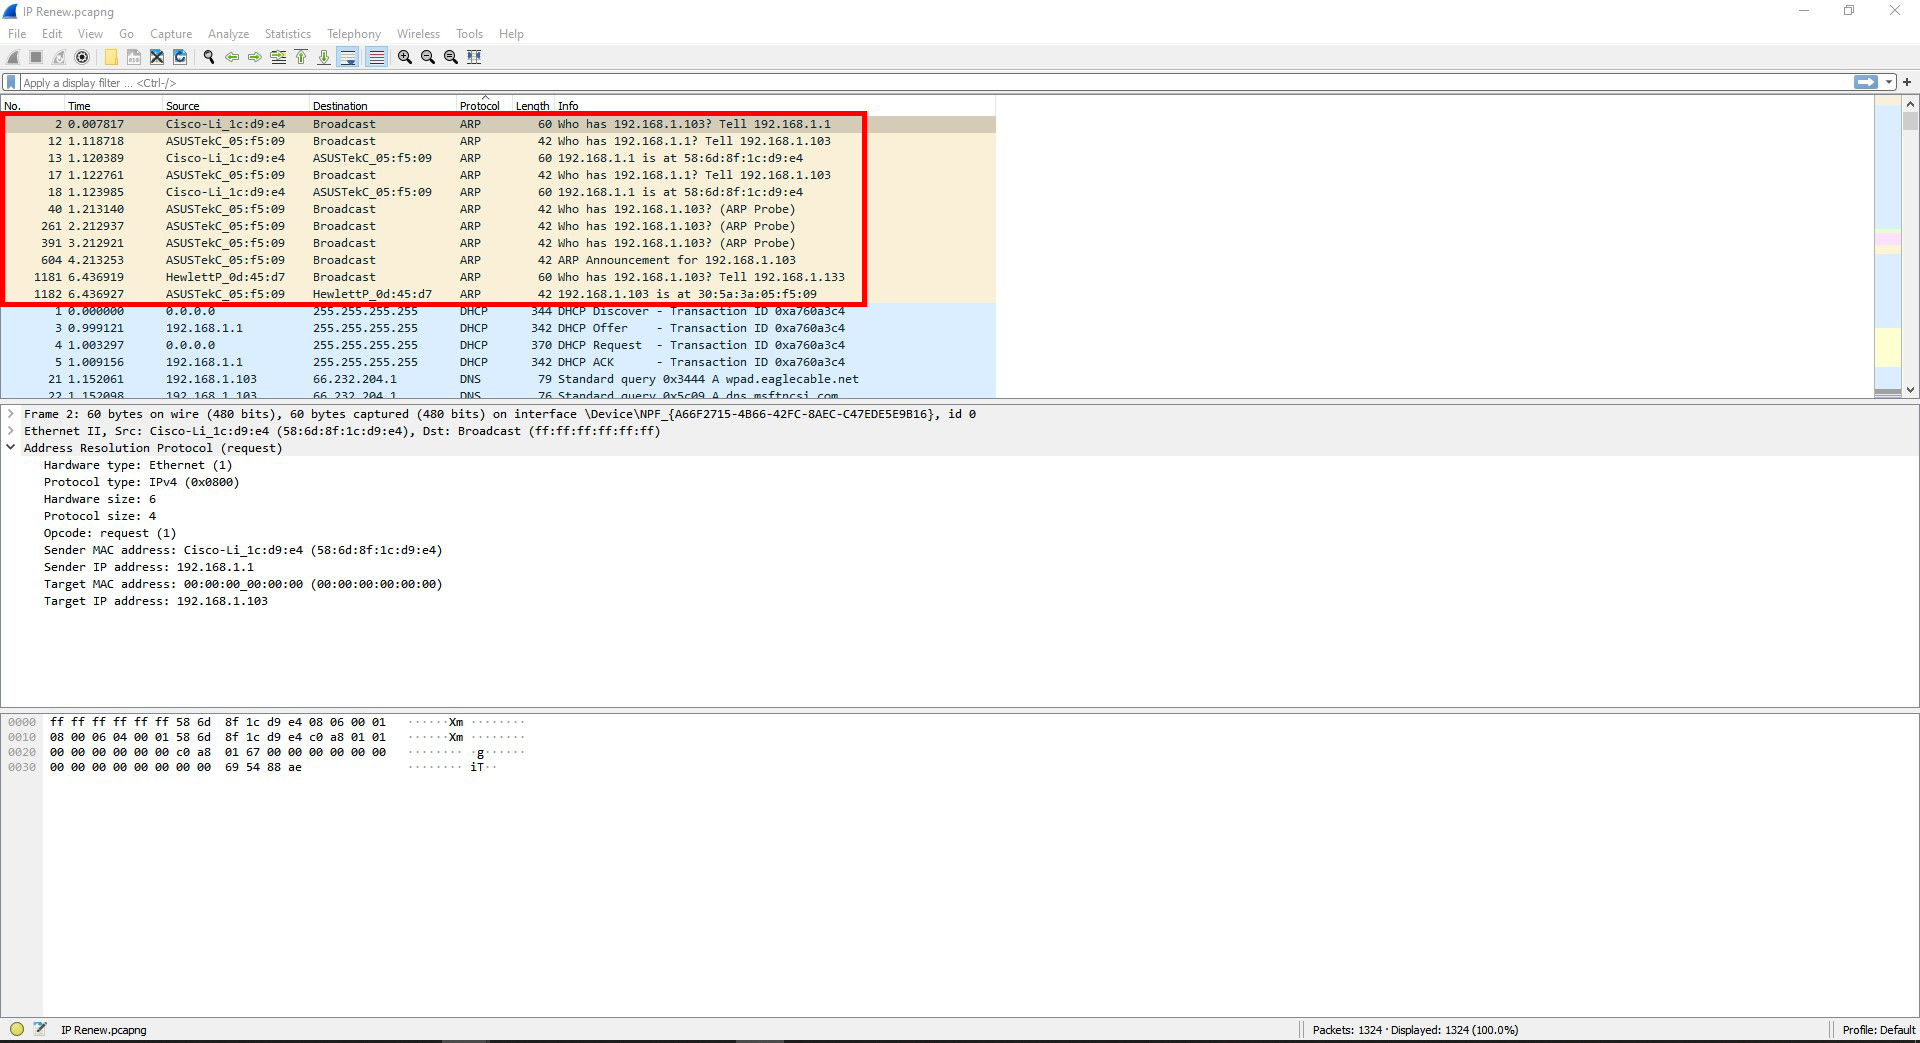
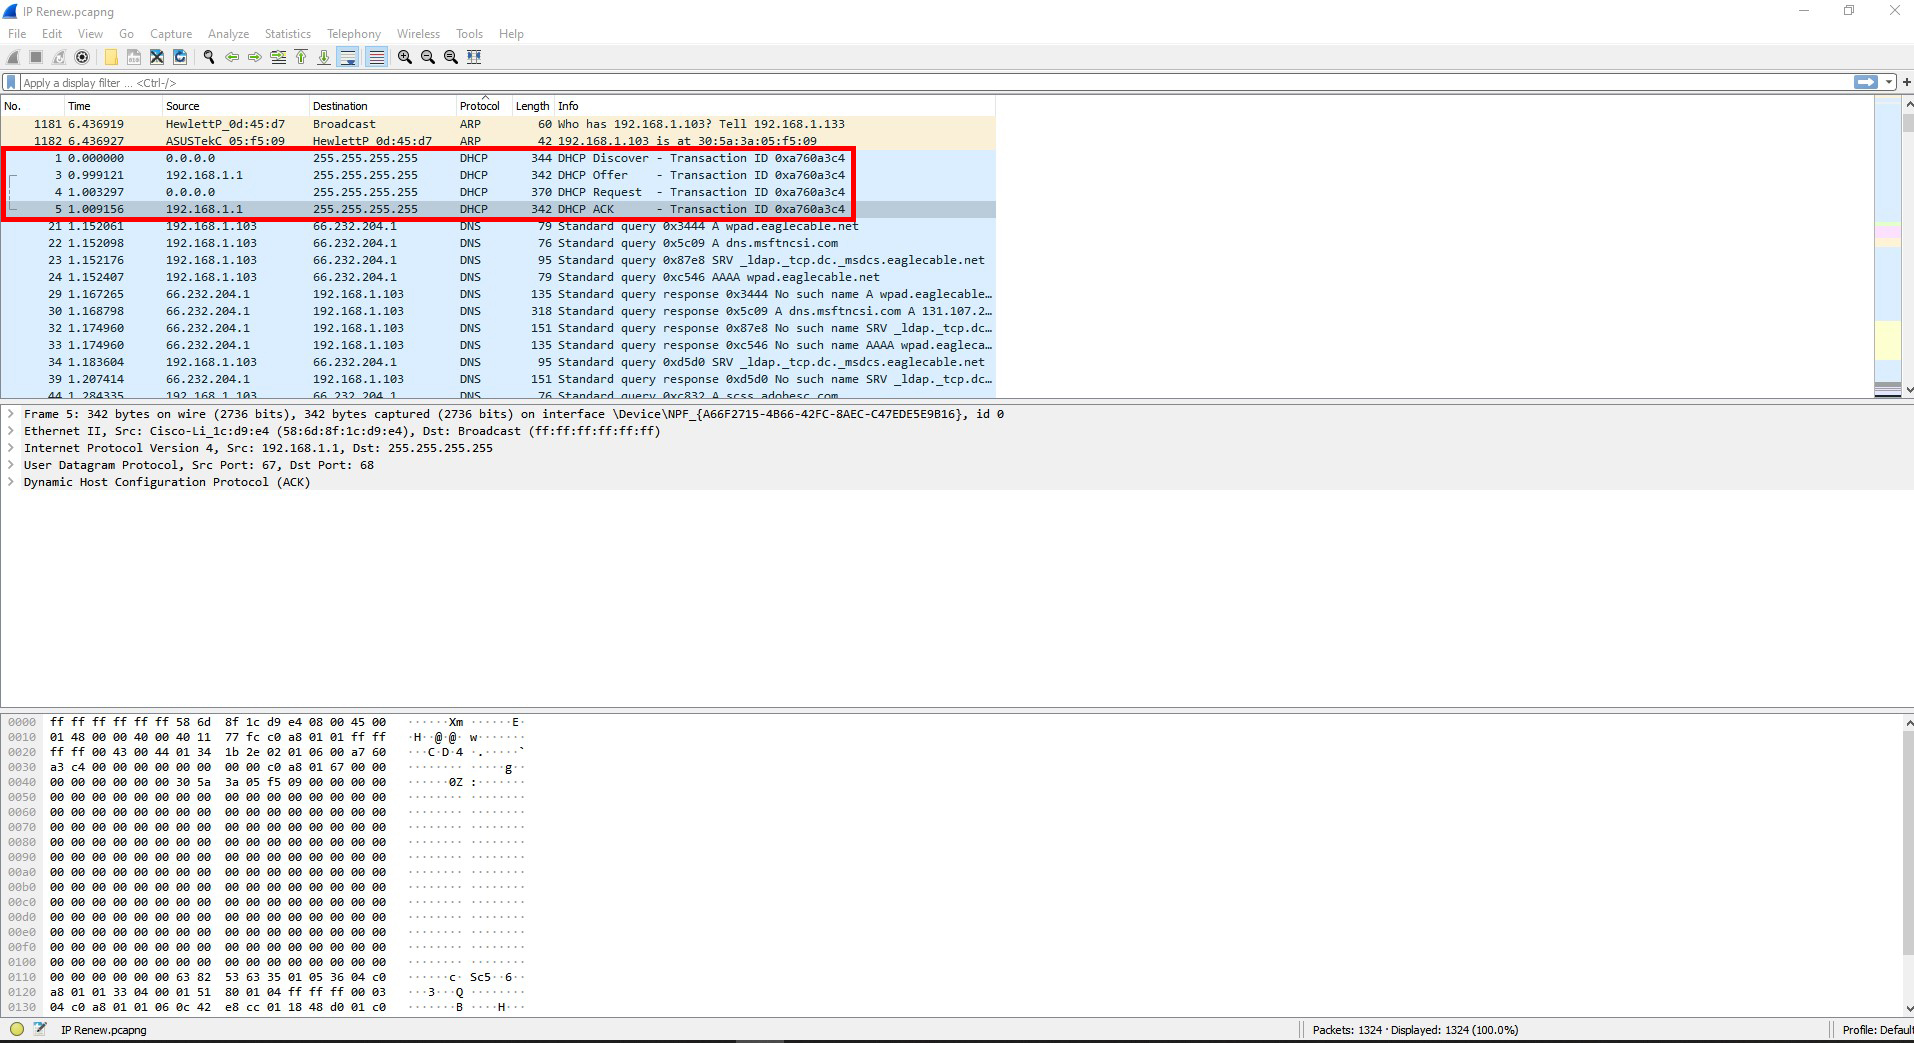
Question #10: Find the frames that show DHCP configuring IP addresses. What is the process for a machine to be assigned an IP address using DHCP? ((Look up “DHCP handshake” online to compare what you see & what is expected.).)
Question #10: Find the frames that show DHCP configuring IP addresses. What is the process for a machine to be assigned an IP address using DHCP? ((Look up “DHCP handshake” online to compare what you see & what is expected.).)
Here are the steps to the DHCP process:
Step 1. The device will send out a DHCP message to the DHCP server for the network its connected to.
Step 2. The DHCP server receives the message and responds back to the device with an IP address. It might offer it other options as well.
Step 3. The device will then respond by requesting the given IP address or one of the other options if given.
Step 4. The DHCP server confirms the IP address and assigns it to the device.
Question #11: What is the purpose of TCP sequence numbers?
TCP sequence numbers organize the data so that the process of sending and receiving data is more reliable.
Question #12: What is the purpose of IP source & destination addresses?
IP source and destination address are what networks use to be able to send and receive data and information to and from each other.
Question #13: What is the purpose of DNS?
DNS is the protocol that links the domain name of a website to its IP address. Remembering a domain name is typically easier than remembering an IP address.
Question #14: What is DHCP?
DHCP is the protocol that automatically assigns IP address to devices when connected to the internet.
Question #15: What the relationship between the OSI model of networking and the real-world TCP/IP model we saw in this lab activity? The OSI model layers 7, 8, and 9 are just the Application layer with TCP/IP.
Question #16: What evidence of layered network design did you discover when examining the captured data? How does the Wireshark data demonstrate encapsulation?
The evidence I saw was that each kind of packet had several layers that it had to pass through.
Wireshark showed this by breaking down the packets by the layers that it had to pass through.
Question #17: What are the implications of having a tool like Wireshark freely available? For network administration? For security?
This program being easily accessible could have both very good and very bad consequences. This could be used for security or network defense. At the same time it could be used to spy and snoop on the activity of a network.
For network administration I could see this being used to figure out problems with a network. This could range from something as simple as a device not working with the network, to trying to find evidence of a suspected network breach.
This could be good from a security perspective since it can monitor everything that is going on with a network.
Diagrams, flowcharts, and figures: N/A
References:
https://www.computerhope.com/jargon/i/icmp.htm
https://www.speedcheck.org/wiki/dhcp/
https://madpackets.com/2018/04/25/tcp-sequence-and-acknowledgement-numbers-explained/
Conclusions: This really showed me what is possible with a packet sniffing program. Before this I never heard of a program like this, so this is totally new to me. Knowing what programs like this can do slightly changes what I think about regarding network security.
Objectives:
Design a network with a random network / base address that uses subnets with the following conditions:
1. It needs four subnets.
2. It has three routers.
3. It has four switches.
4. It has two computers. One at each end of the network.
Equipment list: Assignment instructions, pencil and paper, computer, Photoshop.
Notes and Observations: We’ve been studying and practicing with subnetting for a couple weeks, so the process of figuring out the details of the network and the subnets wasn’t too hard. I did however refer to my notes to make sure that I was doing everything right since this is still new to me and this was the first time that we had to make a diagram / template of a network and fill out the network information for the devices on our own. The longest part of this assignment for me was making the diagram / template for the network. Photoshop worked great for making the diagram / template.
Here is a scanned image of the hand written paper that I made when figuring out the details for the network and the subnets. Below the image is my explanation of the steps I took during the process.
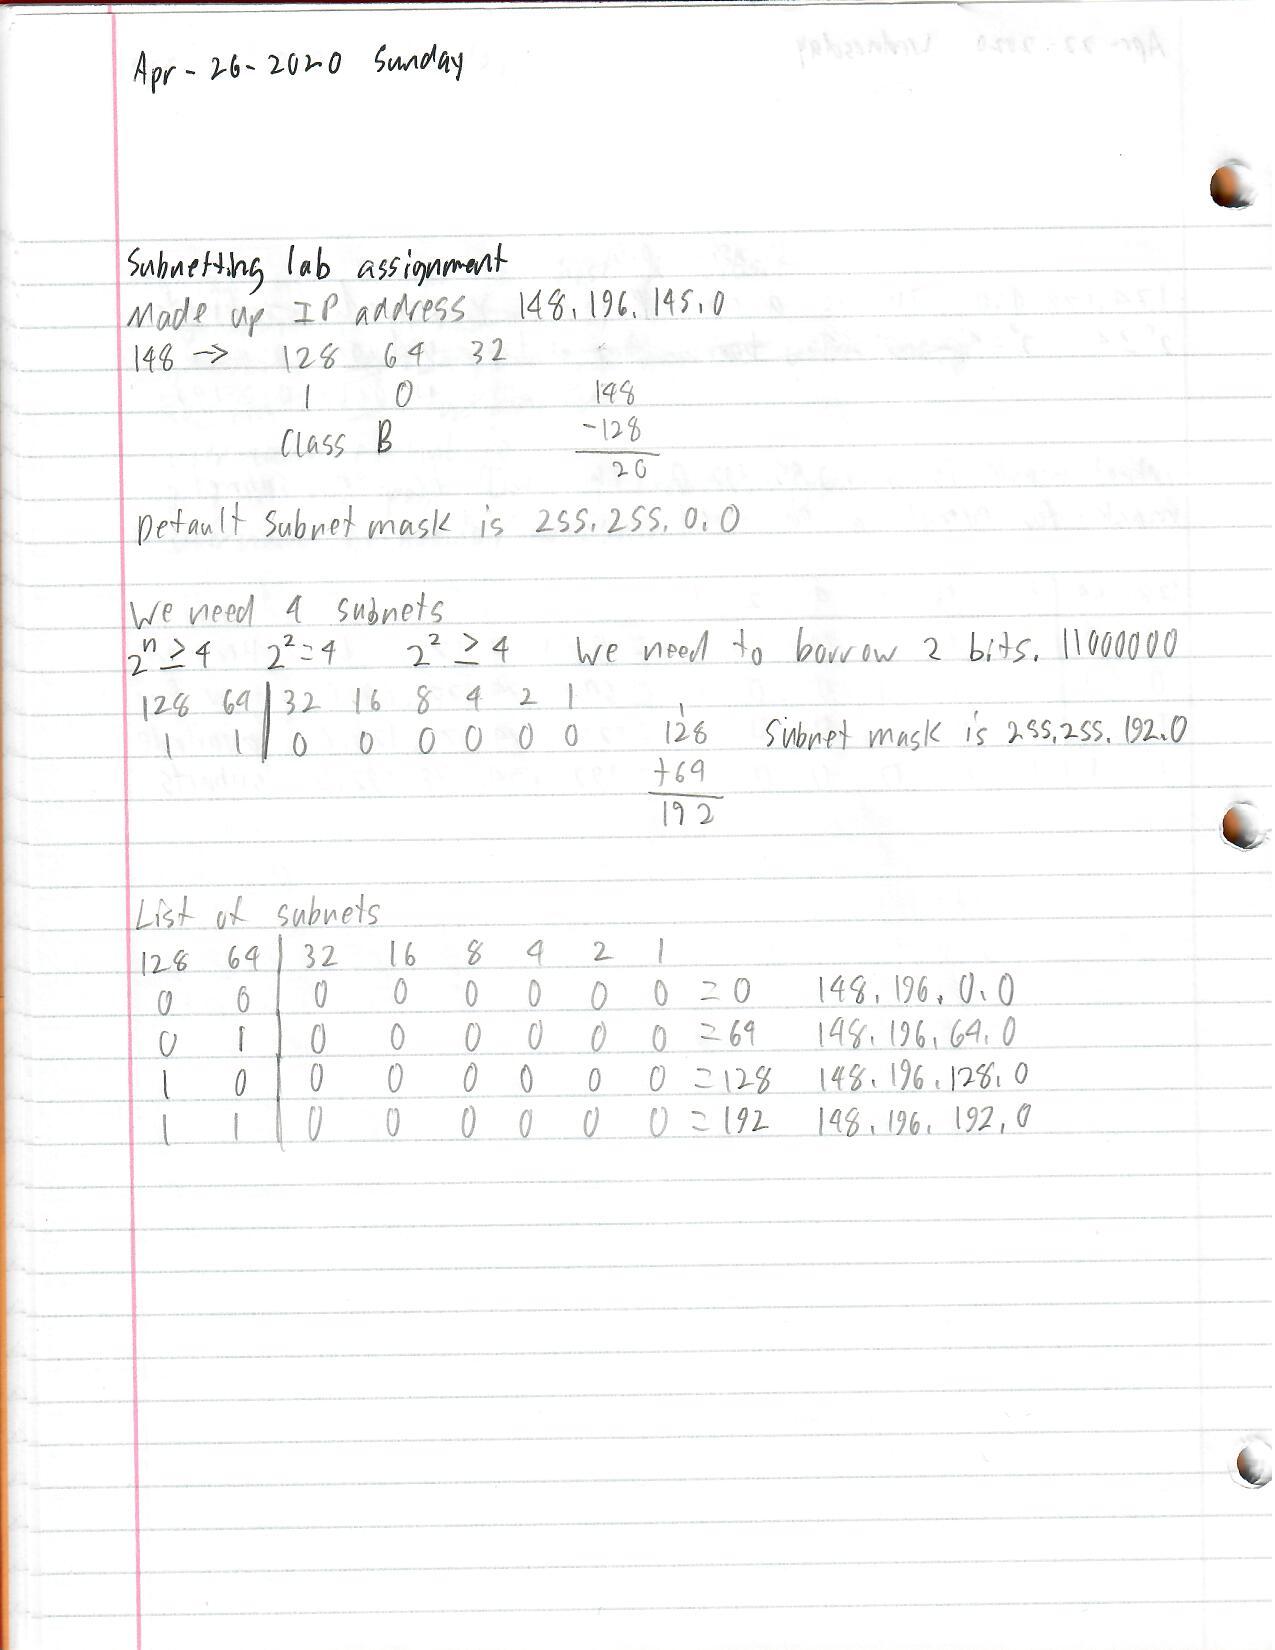
The first step we had to do was to make up a base / network address for the network I had to design. I used dice to get the numbers to make up the address, which was 148.196.145.0 .
Next, I had to determine what class this network would be.
The first octet is 148.
128 64 32 148-128=20
1 0
This starts with 10. This is a class B network. Which makes the default subnet mask 255.255.0.0 .
The next step is to figure out how many bits we’ll need to borrow from the third octet and what the subnet mask will be. The assignment states that we need to break this up into four subnets, so our starting formula would be 2^n >=4 . As long as your doing your math right, whatever we plug into “n” will determine how many bits we need to borrow.
2^2 = 4 .
2^2 >= 4 .
This means that we need to borrow two bits.
128 64 | 32 16 8 4 2 1
1 1 | 0 0 0 0 0 0 128+64=192
This makes the subnet mask 255.255.192.0 .
Now that we know how many bits we need to borrow, we can make a chart of the subnets that we can use on the network.
128 64 | 32 16 8 4 2 1
0 0 | 0 0 0 0 0 0 = 0 148.196.0.0
0 1 | 0 0 0 0 0 0 = 64 148.196.64.0
1 0 | 0 0 0 0 0 0 = 128 148.196.128.0
1 1 | 0 0 0 0 0 0 = 192 148.196.192.0
Now that I had that done. I started to make the diagram / template for the network with Photoshop. The assignment instructions gave us a good idea of how the network should be arranged, so we had to use that same layout when designing our own network.
This is a template of the network that I made before I filled in the information for the network and the devices.
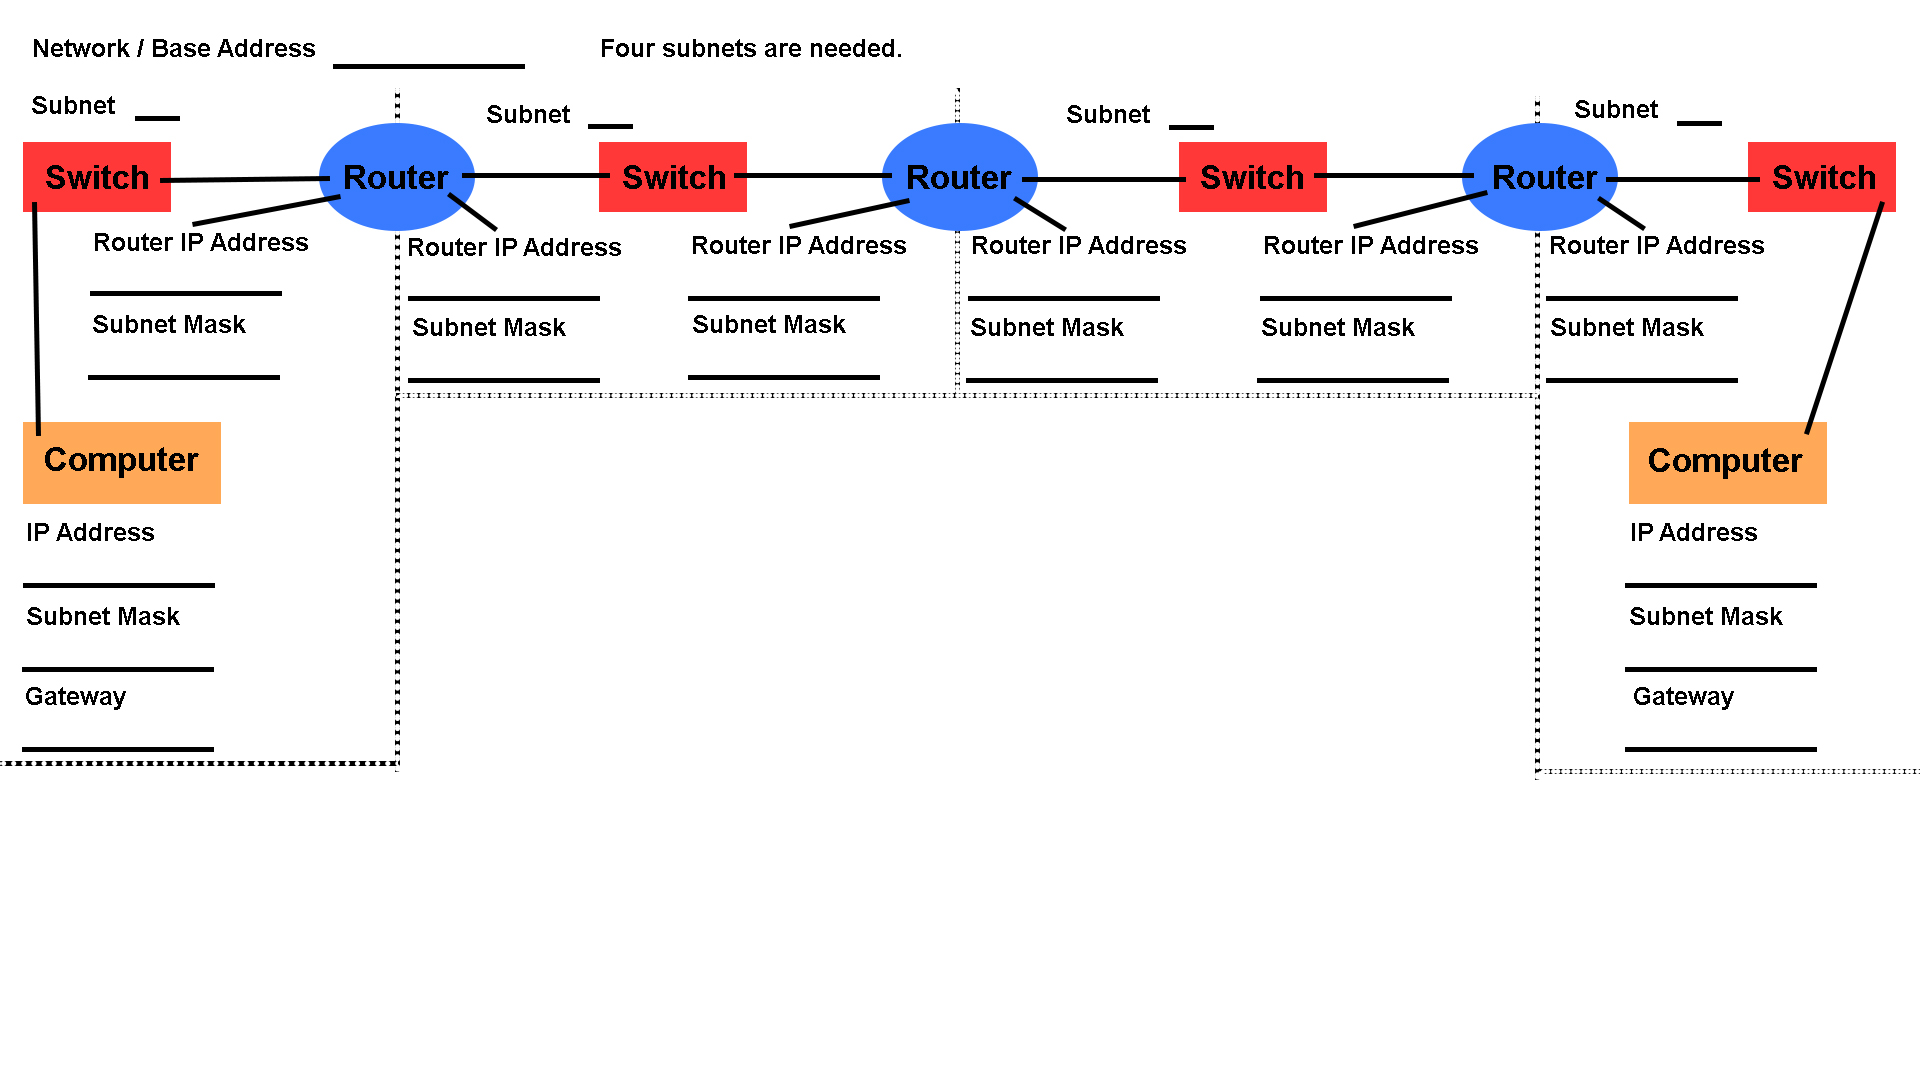
Here is the template with all the details filled out.

Diagrams, flowcharts, and figures: N/A
References: Class notes, and notes from the Sunny Classroom “subnetting is simple” video. https://www.youtube.com/watch?v=ecCuyq-Wprc
This would be a great video to watch if your new to subnetting or if your maybe lost or confused about the details on the filled out template that I didn’t explain. This video was pointed out to us by our instructor.
Here is another video that our instructor pointed out to us regarding the classes of networks. Sunny Classroom “Tricks to five classes of IPv4”. https://www.youtube.com/watch?v=vcArZIAmnYQ .
Conclusions: This assignment was really good for having us go through the process of mapping out a network with subnets. I could see this technique being very helpful and useful anytime you need to build or modify a network because it lets you view the layout of the network in a way that could make it easier to see and understand how it is set up and also keep track of its layout.
Objectives:
1. Download and set up Apache Webserver on a device of your choice.
2. Make a website. A simple and quick one will work.
3. Use Apache Webserver to host the website you made for your local network.
4. Use at least one other device that is using the same network as the device hosting the website to view the website.
Equipment list: Router, two desktop computers, cell phone, and Apache Webserver.
Notes and Observations:
There was parts to this that were easier than I expected but there was also parts that were harder than I expected.
At first I was totally confused as to how I was supposed to download and use Apache Webserver because it wasn’t like most programs or applications where you just download it, install it, and run it. If I understand it right, normally you need to download the main part of the program first, and then either configure it to make it work or you have to download a second part and use that with the program. I could be wrong about this though. I choose to use one of the versions that was ready to go straight from the downloaded file.
The second part that really threw me off was when I was making the website for the webserver. I used a webpage that I had made before but modified it. It had an image in it that I removed, but for whatever reason it would still show up when I looked at the webpage from the webserver. I had no idea what to make of that.
The rest of the process beyond that I think was mostly easy and straight forward.
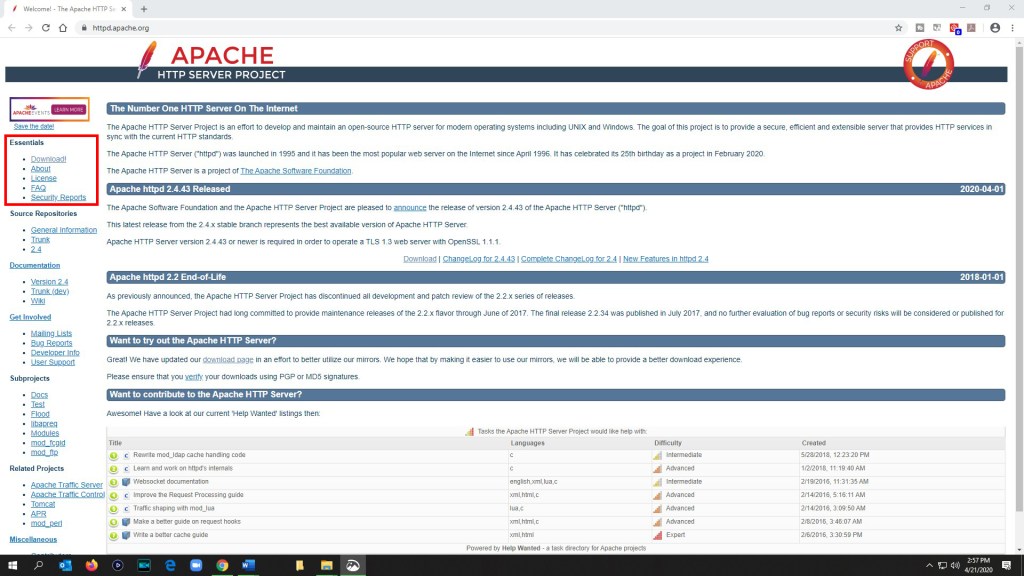
The first thing I did was use a search engine to find Apache Web Server and it led me to The Apache HTTP Server Project website. https://httpd.apache.org/ .
Once I was on this this site I saw the Essentials section on the upper left of the page which had a “Download!” link. https://httpd.apache.org/download.cgi .
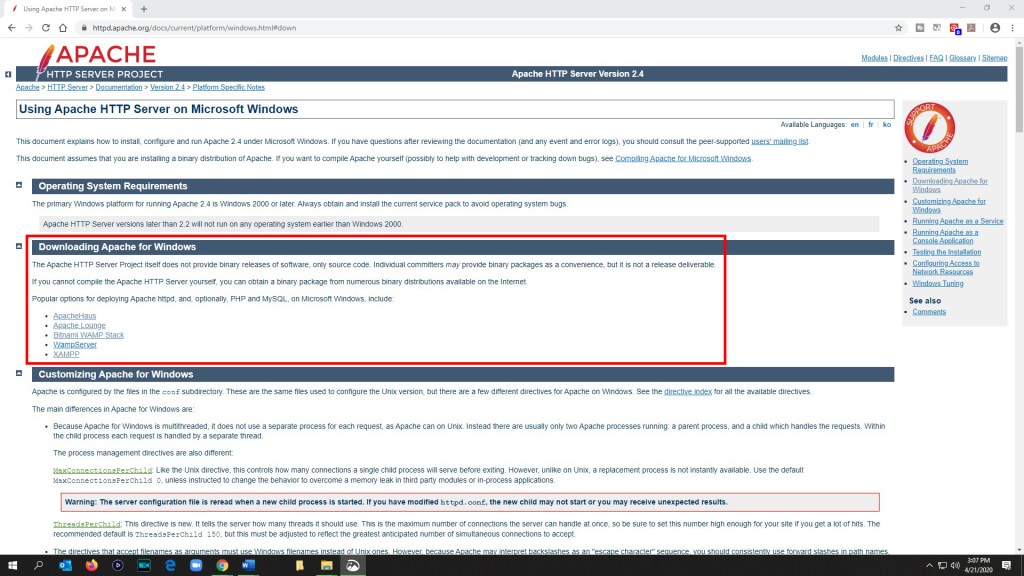
In the Downloading the Apache HTTP Server section in the main body, I used the “a number of third party vendors” link since I’m using a Windows computer. https://httpd.apache.org/docs/current/platform/windows.html#down .

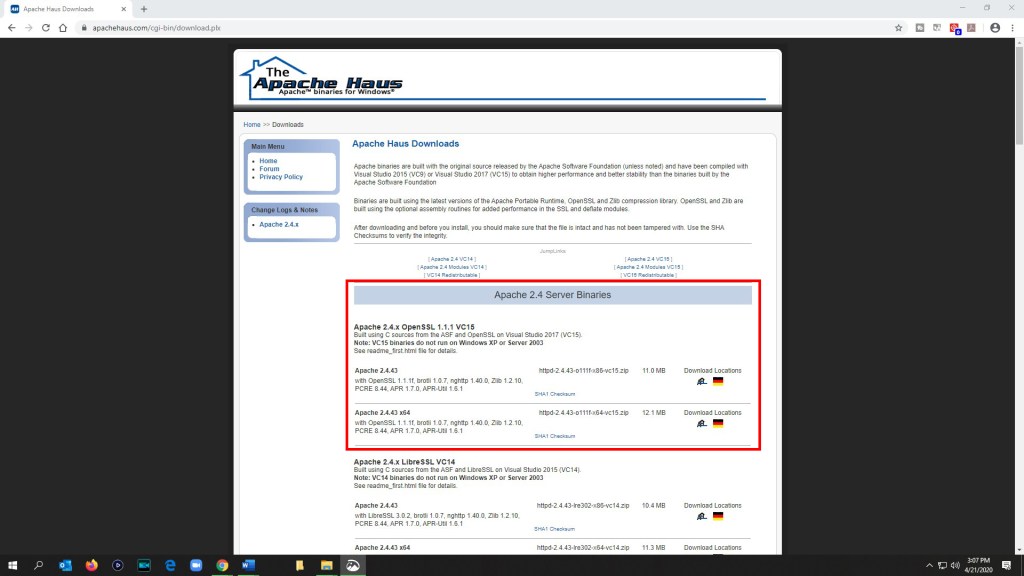
In the Downloading Apache for Windows section I checked out the five links to outside websites that were shown here. I decided to use the first one on the list, ApacheHaus, because it appeared to be the easiest to work with and use. https://www.apachehaus.com/cgi-bin/download.plx
In the Apache 2.4 Server Binaries section I downloaded the Apache 2.4.x OpenSSL 1.1.1 VC15 version (Apache 2.4.43 x64).
After unzipping the downloaded file. I looked at the readme_first.html file and followed the instructions.
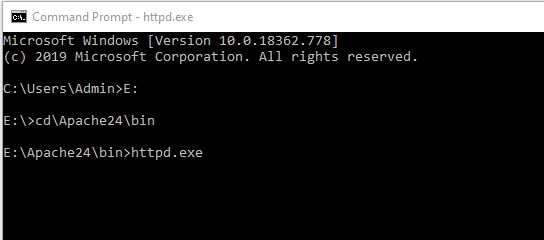
The first step is to take the Apache24 folder and place it in the root directory of your hard drive of choice (I placed it in the E: drive). Then you have to open up the command prompt and type in cd\Apache24\bin . On the next line type in httpd.exe . If there are no errors then nothing should appear to happen (in the beginning of the command prompt I had to switch form the C: drive to the E: drive since I placed the Apache24 folder in the root directory of the E: drive). Make sure you keep the command prompt window open while you’re trying to use the Apache Webserver, if you close it, the webserver will stop working.
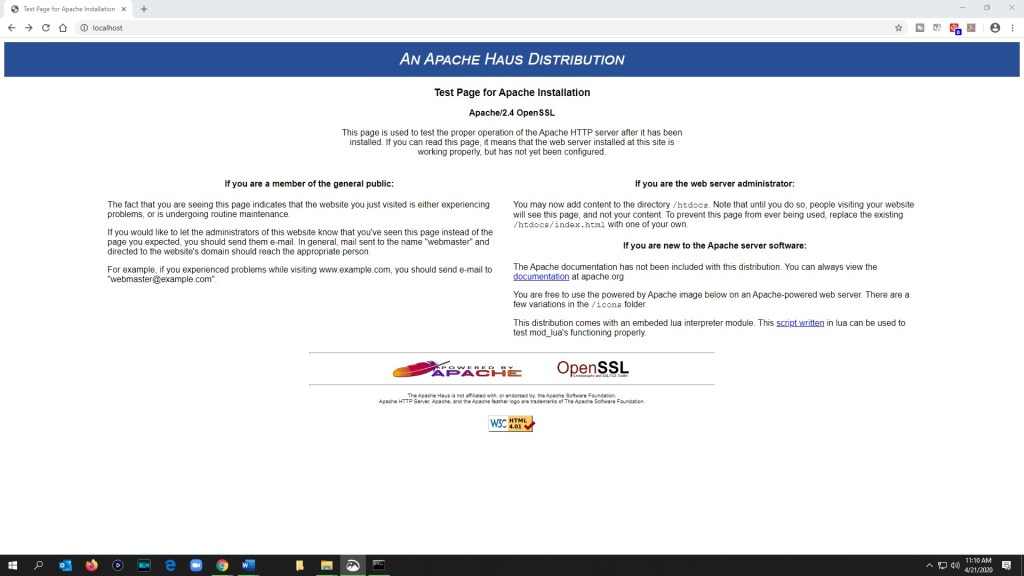
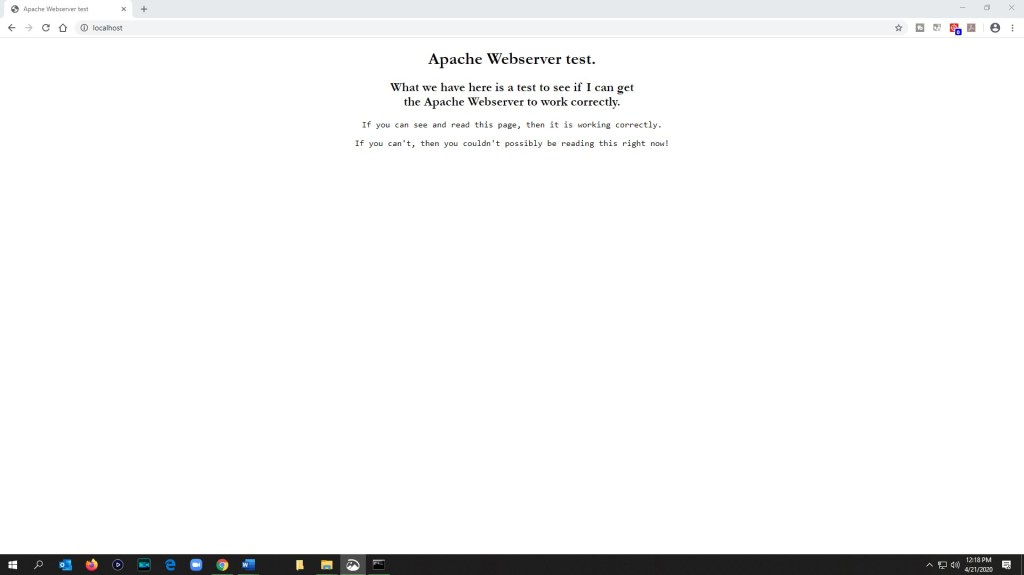
The next step is to open a web browser and type in http://localhost . The Apache Haus’s test page should appear in the browser.
The next step is to change the content of the webpage. The folder that you need to find is htdocs, which is found at Apache24/htdocs . Inside this folder is the index.html file for the Apache Haus’s test page. You can remove or edit this file. I removed it and copy and pasted a webpage that I had made before and made changes to it and tested it to see if it would work and display correctly.
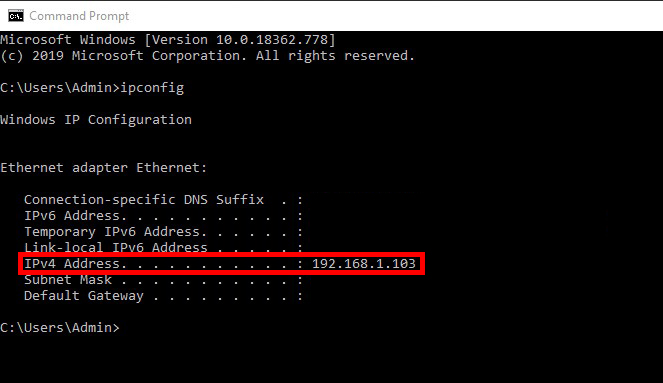
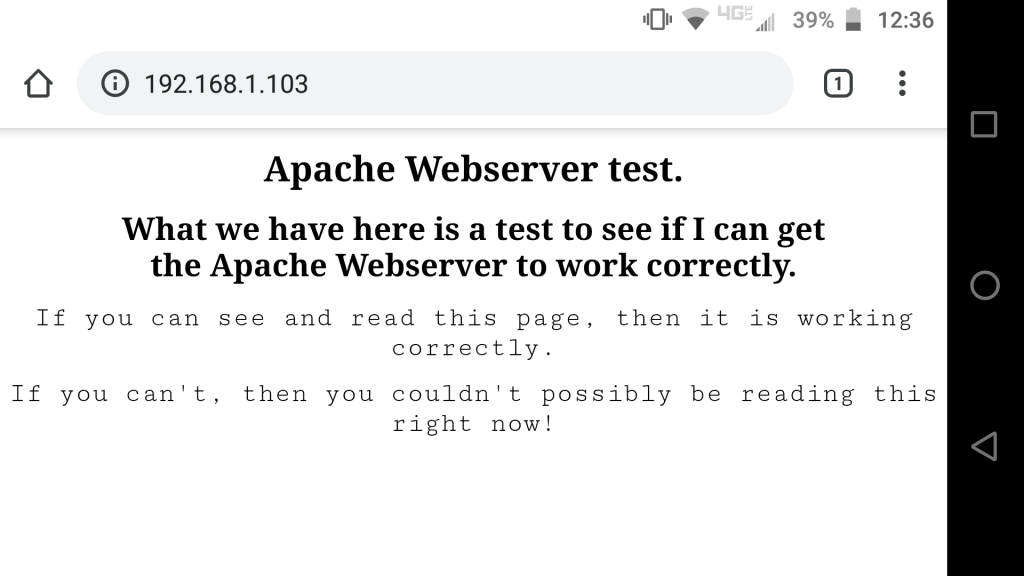
The next step now is to get the IP address for the computer that I’m using as the host for the website and use at least one other device that’s on the same network and use the IPv4 Address on the URL field and see if the website works correctly on it. I used the ipconfig command in the command prompt on the host computer to get the the IP address for it. In this case it is 192.168.1.103. (I have the others parts blacked out as a protective measure for myself)
I then used this IP address on the URL field on a web browser on a cell phone and another computer that are on the same network as the host device. The website worked and displayed correctly on both of them.

Diagrams, flowcharts, and figures: N/A
References: Lab activity instructions.
Conclusions: I can see how Apache Webserver could be useful for the purpose of creating a website and being able to host it with your own hardware. This could be a great option for those who want a website but know that it wont get a lot of traffic and would not be worth the price of paying a website hosting firm to host it for them.
Objectives:
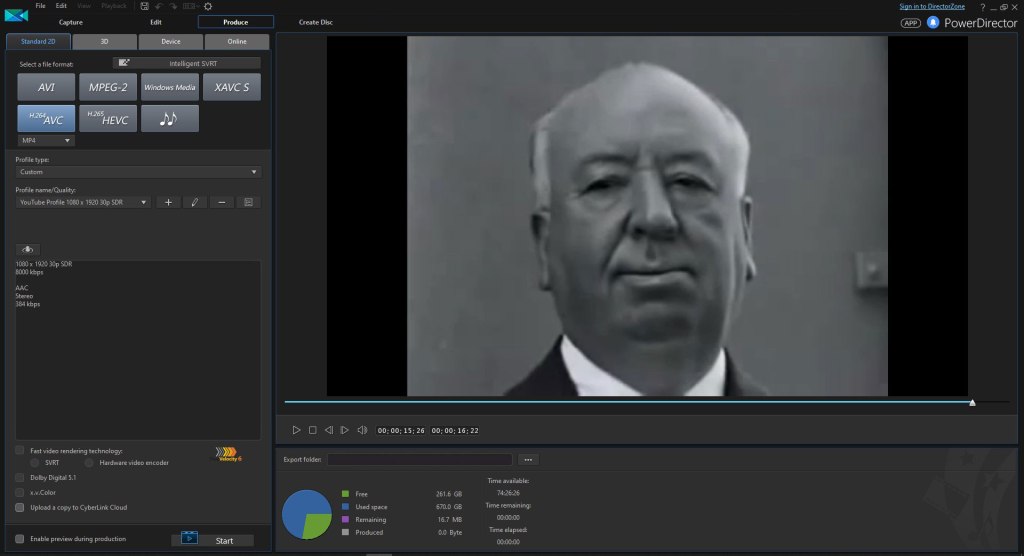
1. Download the video “Hitchcock Loves Bikinis” from YouTube. https://www.youtube.com/watch?v=hCAE0t6KwJY NOTE! Normally this would probably be a copyright violation issue but this is for a school project and is for educational purposes.
2. Use the website “ www.flickr.com/search/advanced/ ” to find and download 2-3 images / pictures for the project. The images must have Creative Commons licenses .
3. Use the website ” https://www.jamendo.com/ ” to find and download 1-2 music tracks for the project. NOTE! The jamendo.com website states that you must get a license to use any of the music in a video or other forms of multimedia. Again, this is for a school project and is for educational purposes.
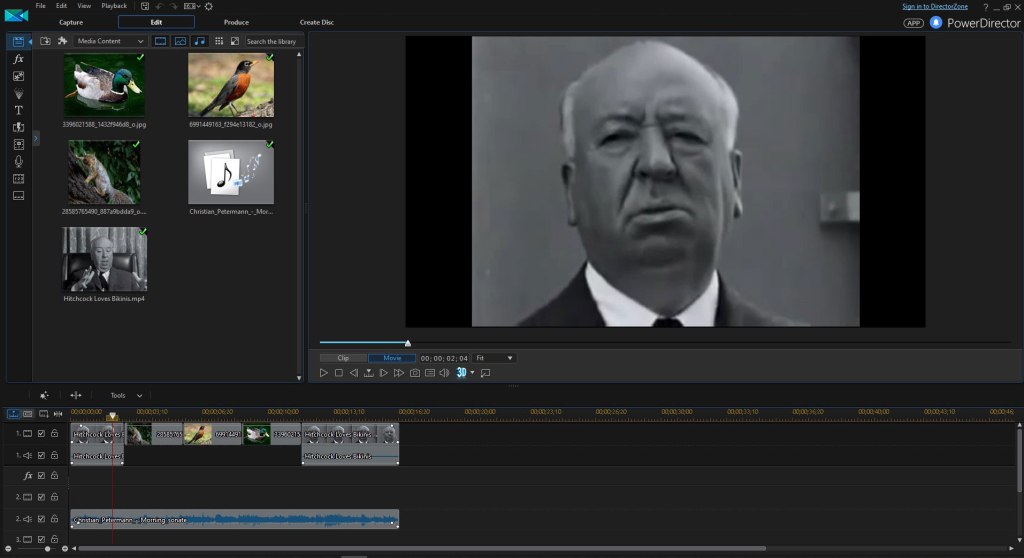
4. Use video editing software / app to change what Hitchcock appears to be looking at in the Hitchcock Loves Bikinis video. We have to use the 2-3 images that we got from flickr.com and the 1-2 tracks that we got from jamendo.com in the edited video. It’s optional to use additional content if desired.
5. Research the Creative Commons licenses https://creativecommons.org/licenses/ and determine which licenses I could use for this video project and why. Also determine which licenses that I wouldn’t be able to use and why. I need to also determine which licenses would allow me to use the content only if I let others use my video as well using a Creative Commons license.
6. Upload / publish the edited video onto YouTube.
Equipment list: Desktop computer, CyberLink PowerDirector 15 (video editing software),
Hitchcock Loves Bikinis video https://www.youtube.com/watch?v=hCAE0t6KwJY , deturl.com and Videovor (used to download the video),
Squirrel image https://www.flickr.com/photos/philfiddyment/28585765490/ https://www.flickr.com/photos/philfiddyment/ ,
American Robin image https://www.flickr.com/photos/mr_t_in_dc/6991449163/ https://www.flickr.com/photos/mr_t_in_dc/ ,
Duck image https://www.flickr.com/photos/vixenrose/3396021588/ https://www.flickr.com/photos/vixenrose/ ,
Morning Sonate (2019) – CHRISTIAN PETERMANN https://www.jamendo.com/track/1694054/morning_sonate
Notes and Observations: I’ve worked on several video projects before in the past so the portion of putting everything together and editing the content was easy for me. The hardest parts was looking through images and listening to music to decide on what to use for the project and typing out this report. I was slightly surprised to see how many images were available on flickr.com with just the Creative Commons license, I really didn’t think there would be that many. I couldn’t find exactly what I was looking for on jamendo.com . I would have liked to use a soundtrack that was just background noise from a park or maybe a forest, but I did find a music track that should work for the mood that I was aiming for.
I looked at the Creative Commons licences and this is what I gathered. There is 6 different Creative Commons licenses.

Attribution
CC BY
This license lets you distribute, remix, adapt, and build on the content as long as you give the original creator credit.

Attribution-ShareAlike
CC BY-SA
This license lets you remix, adapt, and build on the content as long as you give credit to the original creator and use this same Creative Commons licence for your content. For example, if you used an image that has this license in your own content, your content that uses that image needs to use this same license as well.

Attribution-NoDerivs
CC BY-ND
This license lets you use the content as long as you give credit to the original creator and do not alter or change it.

Attribution-NonCommercial
CC BY-NC
This license lets you remix, adapt, and build upon the content as long as you give credit to the original creator and don’t use it for commercial purposes. You don’t need to use the same Creative Commons license if you create and use a derivative of the original content, but you still need to give credit to the original creator.

Attribution-NonCommercial-ShareAlike
CC BY-NC-SA
This license lets you remix, adapt, and build upon the content as long as you give credit to the original creator, don’t use it for commercial purposes, and use this same Creative Commons license for your content. For example, if you used an image that has this license in your own content, your content that uses that image needs to use this same license as well.

Attribution-NonCommercial-NoDerivs
CC BY-NC-ND
This license lets you use the content as long as you give credit to the original creator, don’t alter or change the content, and don’t use it for commercial purposes.
Regarding the question of what content could I use that uses Creative Commons licenses. Keep in mind that the Alfred Hitchcock video is not factored in on this question. I’ll focus on the images that I’ll be using for the edited video. I will have to cut off a portion of the music track and will have the volume fade in and fade out. The music track doesn’t appear to have a Creative Commons license though. Therefore I should be able to any of the images that I’ve selected without issue regarding the Creative Commons licenses.
Attribution
CC BY
I will be giving credit to the original creators of the images.
Attribution-ShareAlike
CC BY-SA
I will be giving credit to the original creators of the images and would apply the same license to my video if YouTube allowed me to.
Attribution-NoDerivs
CC BY-ND
I will be giving credit to the original creators of the images and I won’t be altering or changing the images.
Attribution-NonCommercial
CC BY-NC
I will be giving credit to the original creators of the images and will not be using this video for commercial purposes.
Attribution-NonCommercial-ShareAlike
CC BY-NC-SA
I will be giving credit to the original creators of the images, will not be using this video for commercial purposes, and would apply the same license to my video if YouTube allowed me to.
Attribution-NonCommercial-NoDerivs
CC BY-NC-ND
I will be giving credit to the original creators of the images, I won’t be altering or changing the images, and I won’t be using the video for commercial purposes.
Content that uses the following licenses are what I would use if I needed to create content that had to be used or shared under the same Creative Commons licenses.
Attribution-ShareAlike
CC BY-SA
and
Attribution-NonCommercial-ShareAlike
CC BY-NC-SA
Diagrams, flowcharts, and figures:
References: Assignment instructions for Lab 6.
Conclusions: This is the first time that I’ve worked on a video project where I had to be aware about the Creative Commons licenses. Having to factor that in when trying to make a video project does change the process a little bit. Knowing about the Creative Commons licenses and how to find content that uses them could be very useful for anyone who makes any form of multimedia content. It’s nice to see that there is a copyright standard out there that makes it easy and user friendly to know what you can do with the content without going through the hurdles and time process of asking if you can use something. That process in itself can get very frustrating.
Here’s a link to the finished video.
Objectives:
1. Create a network with half of the class and make sure it works correctly.
2. Connect that network to a router and then configure the router to connect the network to the other network in the classroom.
3. Check to see if the connection to the computers on the other network is working correctly.
Equipment list: Dr. Gx’s handout, desktop computers, switches, a router, and patch cables.
Notes and Observations:
I’ve never dealt with a networking project like this so almost all of this felt knew to me. It wasn’t really hard, it was more of a learning curve issue for me. There was a few issues that I ran into during the exercise.
When we starting to look into how to manually change the IP address, we got onto websites that told us that we had to use the command prompt with certain commands. It turned out that it was not helpful at all and the correct way was actually pretty simple and fast.
We found out that to apply the manually set settings you have to close the window for the NIC. At first I didn’t close this window and for a few moments we couldn’t think of why my computer was the only one that wasn’t working with the network.
When they were configuring the router, I tried to follow what they were doing and I got the general idea of what they were doing but I would need to do it myself to have a better handle on it.
Question 1. What is the differences between the missions of the Internet Assigned Numbers Authority (IANA) and the American Registry for Internet Numbers (ARIN)?
IANA coordinates the global use of the Internet Protocol (IP) addressing systems and the Autonomous Systems Numbers (ASN) that route internet traffic. Their main role regarding IP addresses is to allocate “pools” of unallocated IP addresses to the Regional Internet Registrys (RIR).
ARIN is the RIR that covers the United States, Canada, andmany Caribbean and North Atlantic islands. It manages and distributes internet number resources such as IP addresses and ASNs within its region.
Question 2. What are some reasons to update TCP/IP to IPv6 and what are some reasons to continue to use IPv4?
Some reasons to update to IPv6 are that it can support much more IP addresses, is more secure, and eliminates some connectivity issues that exists with IPv4.
Some reasons to continue using IPv4 is that there is many devices that would not be able to use IPv6, the concern of getting devices that are on IPv4 to communicate to devices using IPv6, and devices that don’t connect straight to the internet with TCP/IP and send or receive only small packet headers could be badly effected by IPv6.
Lab exercise: Set up a network, hook up the network to a router, and see if we can communicate with the other network in the classroom.
Step 1. My group of classmates was “Group C”. Our IP address was based on 192.168.10 . We hooked up all the computers to a switch.
Step 2. On each of the computers we had to configure the IP addresses manually. To do this on Windows 10:
1. Go to the Control Panel.
2. Go to Network and Internet.
3. Go to Network and Sharing Center.
4. Go to Change Adapter Settings.
5. Right click on the icon that’s for your computers NIC and select Properties.
6. Look at the list and select Internet Protocol Version 4 (TCP/IP) and click on Properties.
7. Click on Use the following IP address and fill out the network settings.
8. When completed, click on OK and then close the window for the NIC.
My computers IP address was set to 192.168.10.2
The Subnet Mask filled itself automatically to 255.255.255.0
The default gateway was set to 192.168.10.254
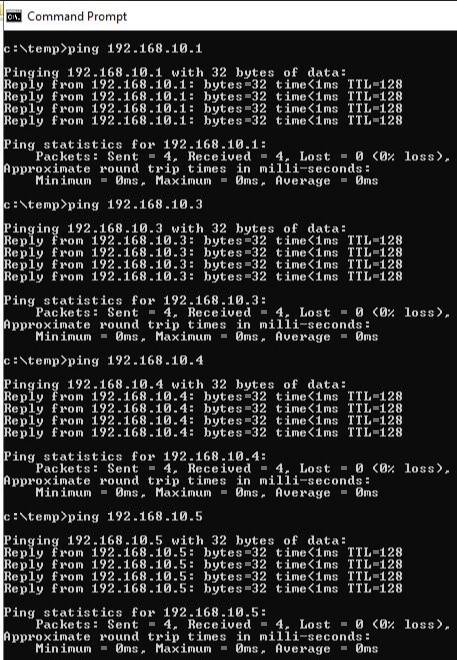
Step 3. We had to check to see if all the computers were connected to the network correctly. We used the Command Prompt and used ping with the IP addresses that had been set for each computer on the network. When we all got ping results from the other computers, we then knew that the network was working correctly.
Step 4. Now we needed to hook up the switch to the switch to the router and configure the router to use the IP address for our network, which was 192.168.10.254 , and for the other networks IP address. We simply plugged an ethernet cord to one of the inputs of the router. We had a separate computer that had the software needed (hyperterminal) to talk to the router and was plugged into the console port of the router. Using this separate computer another student and Dr. Gx configured the router. The software looks and functions similarly to the command prompt on Windows 10.
Step 5. Now that the router was configured, we had to make sure that our computers and network was working correctly with it. We used the ping command again but used the IP address 192.168.10.254 . All of our computers got a ping response.

Step 6. Test the connectivity between the to networks.
I didn’t do this step. By the time I remembered that I had this last step, the networks were already being taken down. I think some of the other people in my group pinged some of the computers on the other network and got a response.
Question 3. What protocol is used to automatically (dynamically) assign IP addresses to machines?
Dynamic Host Configuration Protocol (DHCP)
Diagrams, flowcharts, and figures:

References:
https://www.link-labs.com/blog/why-ipv6-is-important-for-internet-of-things
Conclusions:
This was definitely an interesting class today. A long time ago I had dealt with a router that had to be configured but the scenario and network was simpler than what we set up in class. I’d like to get a chance to use the hyperterminal software and configure the router myself some time.
Objectives:
1. Do research on background information about the OSI model.
2. Examine the various network devices in the classroom and find out what they are and what their function and purposes are.
3. Do research on the Data Link Layer (Layer 2).
4. Use the Command Prompt on a computer to find various details about the network that the computer is connected to.
Equipment list:
Dr. Gx’s handout, various network devices, desktop computer, notes from previous classes.
Notes and Observations:
This took longer to work through than what I expected and I had several questions for Dr. Gx along the way. When I tried looking up the various network devices, there was some that were obsolete and I could only find a limited amount of information about them. I never did find out for sure what the ADC Kentrox DataSmart T1 DSU/CSU was, I’ll have to remind myself to ask Dr. Gx about it.
Question 1, 2, and 3.
The OSI model was created because companies were making their network devices with their own designs and were too often not compatible with network devices that were made by other companies. Since this was bad for both the companies and the consumers, many of the leading companies agreed to use a single model that their network devices would be designed to work with. The result was the OSI model.
OSI stands for Open System Interconnection. It was created by the International Organization for Standardization (ISO) in 1984.
OSI mnemonic, Please Do Not Touch Steve’s Pet Alligator.
| Layer # | Layer Name | Mnemonic | Devices, PDU, and Description of Function |
| 7 | Application | Alligator | Devices – No hardware or devices PDU – Datagrams Functions -Organizes Segments into Datagrams |
| 6 | Presentation | Pet | Devices – No hardware or devices PDU – Datagrams Functions -Organizes Segments into Datagrams |
| 5 | Session | Steve’s | Devices – No hardware or devices PDU – Datagrams Functions – Organizes Segments into Datagrams |
| 4 | Transport | Touch | Devices – No hardware or devices PDU – Segments Functions – Organizes Packets into Segments and send them to Layer 5 Transmission Control Protocol (TCP) User Datagram Protocol (UTP) |
| 3 | Network | Not | Devices – Routers PDU – Packets Functions – Organizes Frames into Packets and sends them to Layer 4 Internet Protocol (IP) Internetwork Packet Exchange (IPX) |
| 2 | Data Link | Do | Devices – Switches, Bridges, Network Interface Cards (NIC), and Multiplexers PDU – Packets Functions – Organizes Bits into Frames and sends them to Layer 3 Carrier Sense Multiple Access / Collision Detection (CMSA/CD) Media Access Control (MAC) |
| 1 | Physical | Please | Devices – Hubs and Repeaters PDU – Bits Functions – Sends Bits to Layer 2 |
Question 4.
The purpose of a router is to connect two or more networks together.
The purpose of a switch and a hub is to connect two or more computing devices together to form a network. The difference between a switch and a hub is that a hub will send the data to everything that’s on the network. Whereas a switch will send the data to only the intended device.
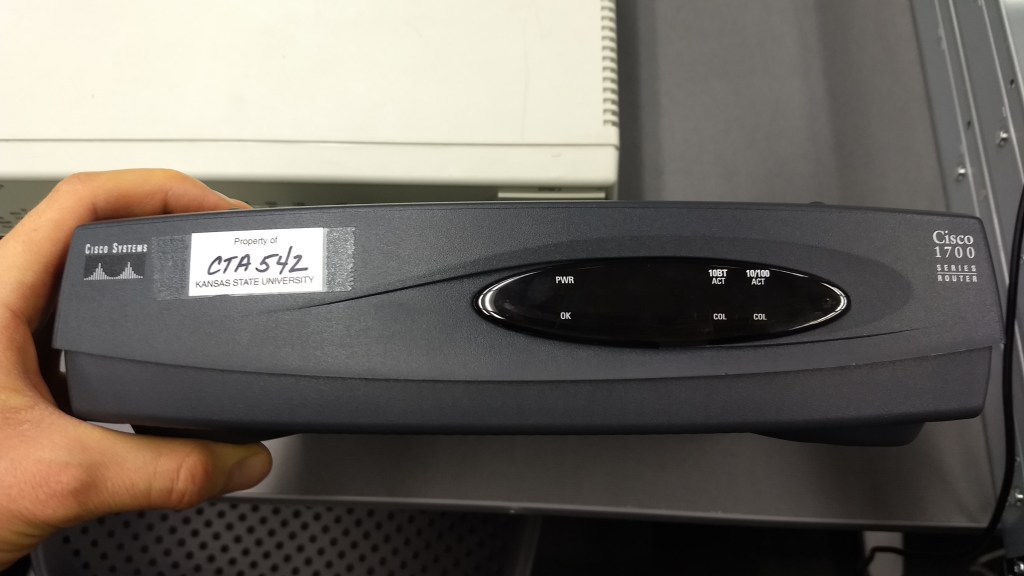
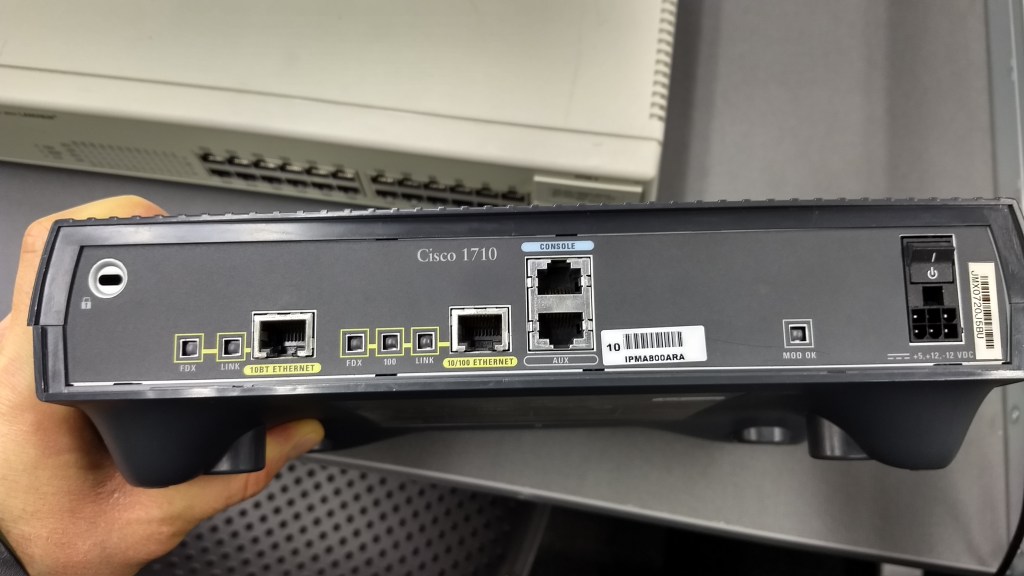
Cisco Systems Cisco 1700 Series Router
A dark gray table top device with indicator lights on the front.
Connections and Port – (Back) 10BT Ethernet, 10/100 Ethernet, Console, and Aux.
Indicator Lights – (Front) Power, OK, ACT and COL for 10BT, ACT and COL for 10/100. (Back) FDX and Link for 10BT Ethernet, FDX, 100, and Link for 10/100.
This devices function would be to connect two networks together.
Its purpose would typically be for connecting a network to another network and/or to an internet connection.
It would be on Layer 3 of the OSI model.
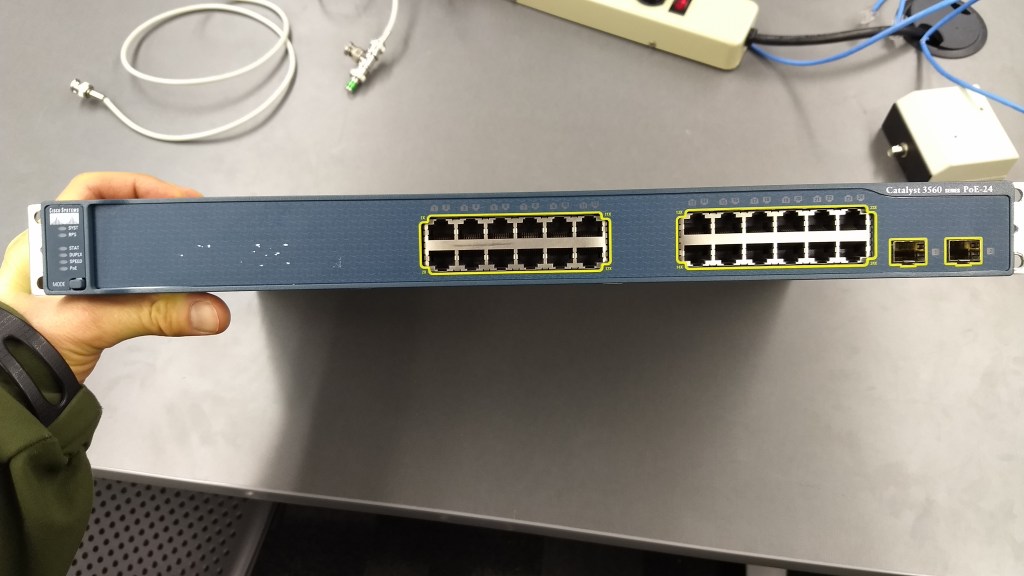
Cisco Systems Catalyst 3560 PoE-24
A dark blue / dark gray rack mount device with the primary connection ports on the front.
Connections and Ports – (Front) 24 10/100/1000 Ethernet. 2 SFP Module.
(Back) Console.
Indicator Lights – (Front) SYST, RPS, STAT, DUPLX, SPEED, PoE.
This devices function would be to connect two or more computing devices to create a network.
This devices purpose would be to allow computing devices to communicate with each other and also could be connected to a router to allow internet access to all the devices connected to it.
It would be on Layer 2 of the OSI model.

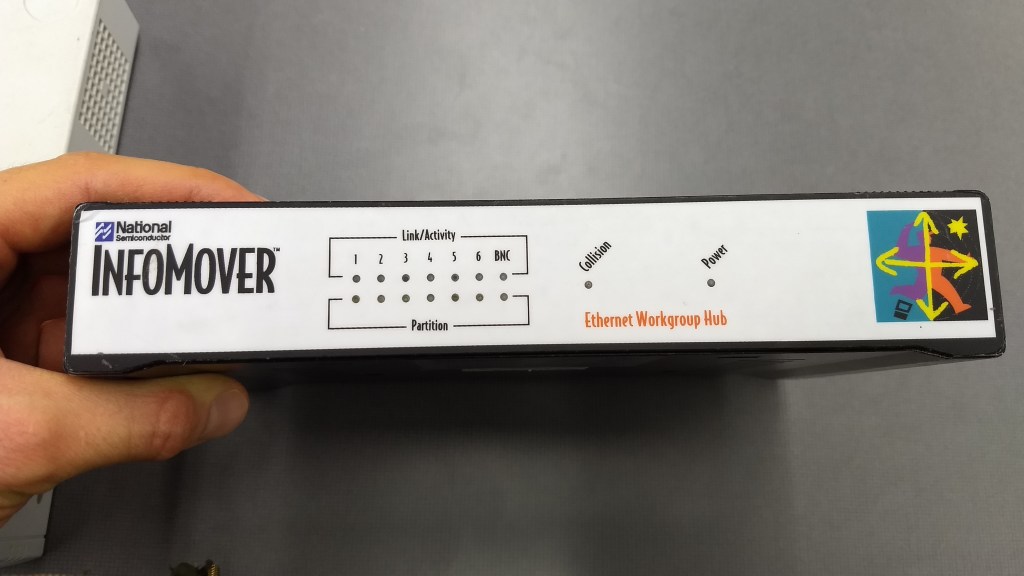
National Semiconductor InfoMover
A tabletop device with several indicator lights on the front.
Connections and Ports – (Back) 6 Ethernet Ports (probably 10 Megabit). Coax (ThinNet).
Indicator Lights – (Front) Link / Activity and Partition for each ethernet port, Collision, and Power.
This devices function would be to connect two or more computing devices to create a network.
This devices purpose would be to allow computing devices to communicate with each other and also could be connected to a router to allow internet access to all the devices connected to it.
It would be on Layer 1 of the OSI model.

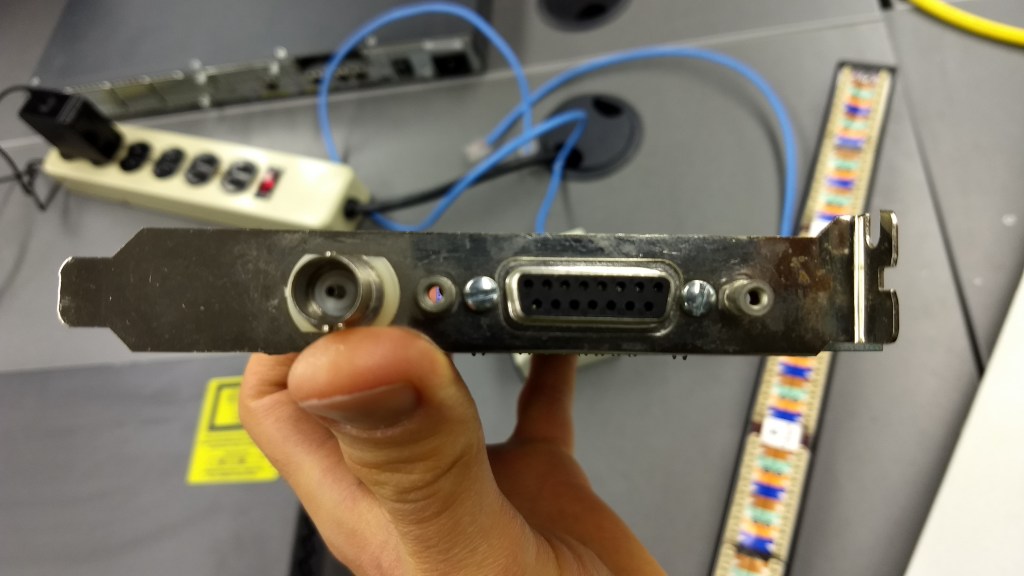
Network Interface Card, unknown make or model.
Network Interface Card (NIC)
It’s a piece of computer hardware that is not currently installed inside a computer.
Connections and Ports – Coax (ThinNet) and a port for a Vampire Clamp.
Indicator Lights – None
This devices function is to be installed inside a computer to allow network access.
The purpose of this device is to connect a computer to a network. This connectivity allows for communication to other computing devices on the network. It would also allow internet access if there is a router connected to the network.
The device would be on Layer 2 of the OSI model.

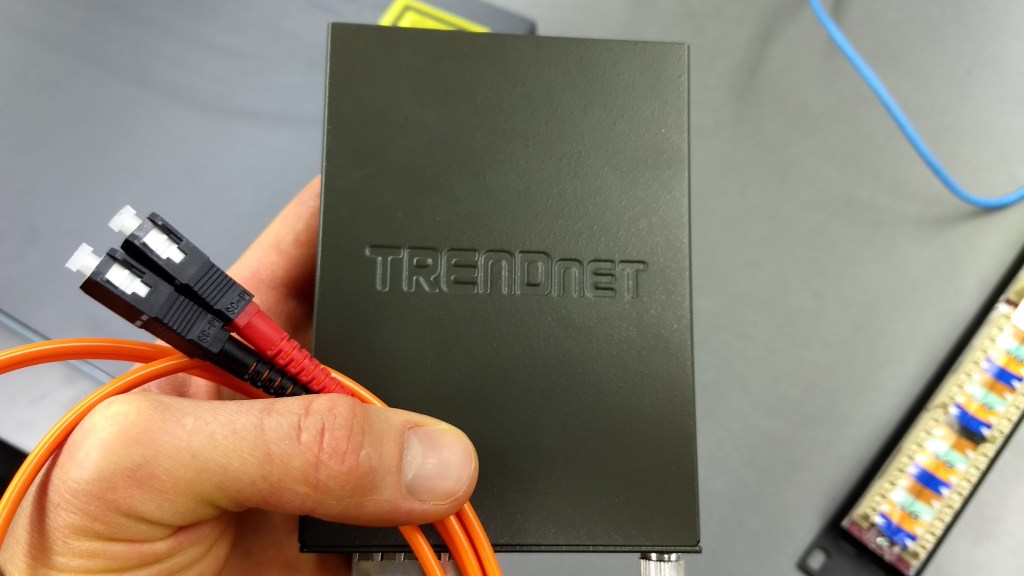
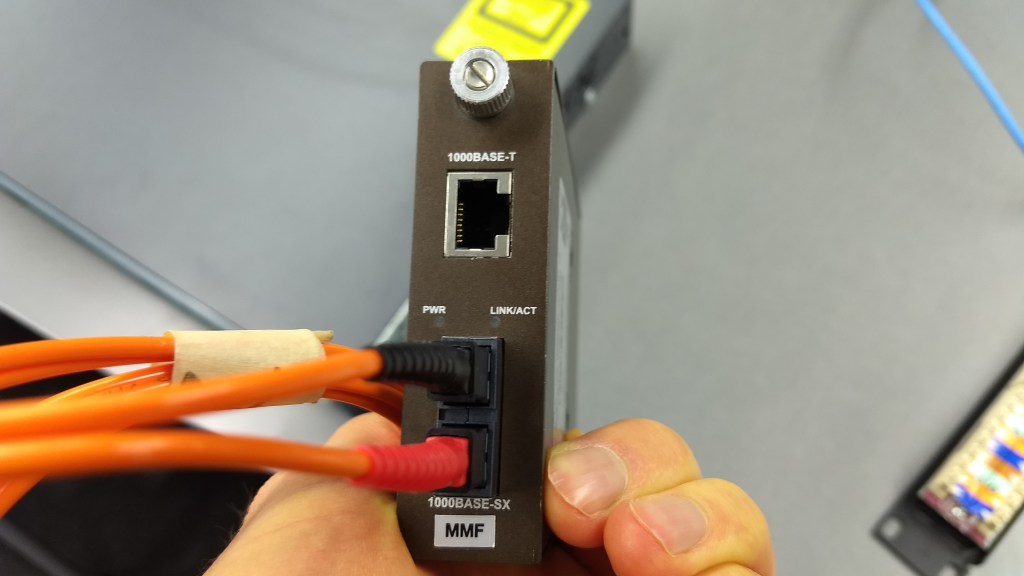
TRENDnet TFC-1000MSC
A small dark gray device with a few ports.
Connections and Ports – 1000BaseT Ethernet, 1000Base-SX.
Indicator Lights – PWR, LINK/ACT.
This devices function is to convert fiber optic cables input into an ethernet output.
The purpose of this device would be to provide an easy way to take incoming fiber optic cables and hook it up to a network that uses ethernet cables.
This would be on Layer 1 of the OSI model.
Question 5.
Another name for the physical address is the Media Access Control (MAC).
The MAC has 48 bits for the physical address.
When two machines attempt to transmit at the same time and the messages become garbled and unintelligible, the condition called Collision has happened.
The PDU (Protocol Data Unit) of Layer 2 of Frames.
Question 6.
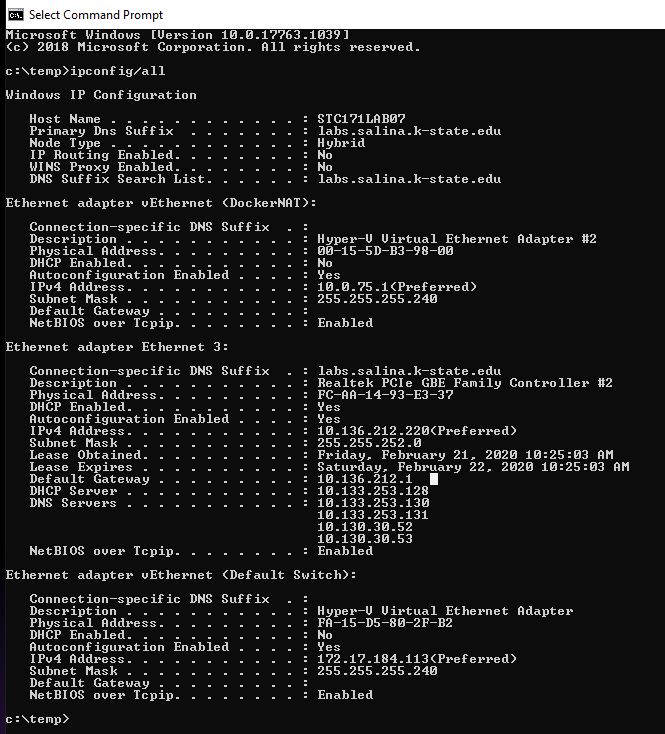
The IP (IPv4) address is 10.136.212.220 .
The protocol to dynamically assign IP address is Dynamic Host Configuration Protocol (DHCP).
The MAC (physical) address is FC-AA-14-93-E3-37 .
MAC addresses are assigned at the time of manufacture.
The manufacturer is GIGA-BYTE TECHNOLOGY.
The DNS servers are:
10.133.253.130
10.199.253.131
10.130.30.52
10.130.30.53
The purpose of a Domain Name Server (DNS) is to store domain names and link them to the IP address that the domain uses. With this, people can use the domain name instead of its IP address to reach a website.

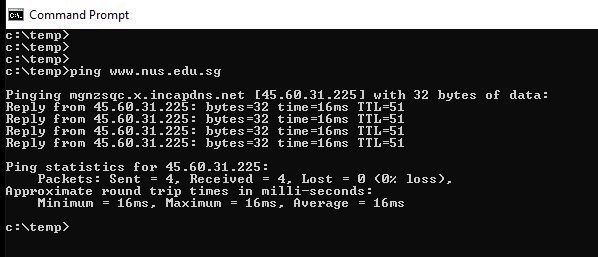
Question 7.
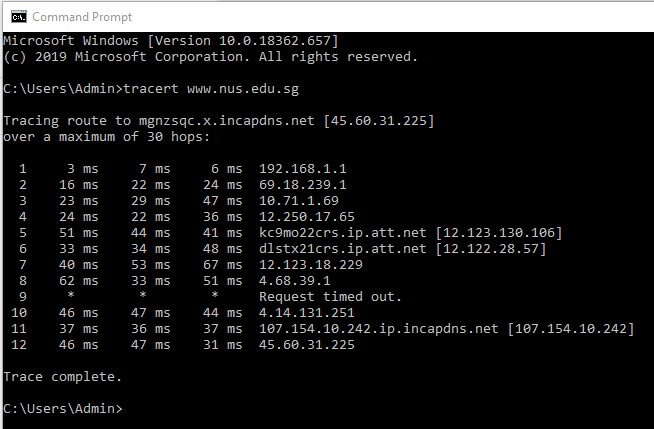
A ping from the computer to Singapore and back (www.nus.edu.sg) took 16 ms.
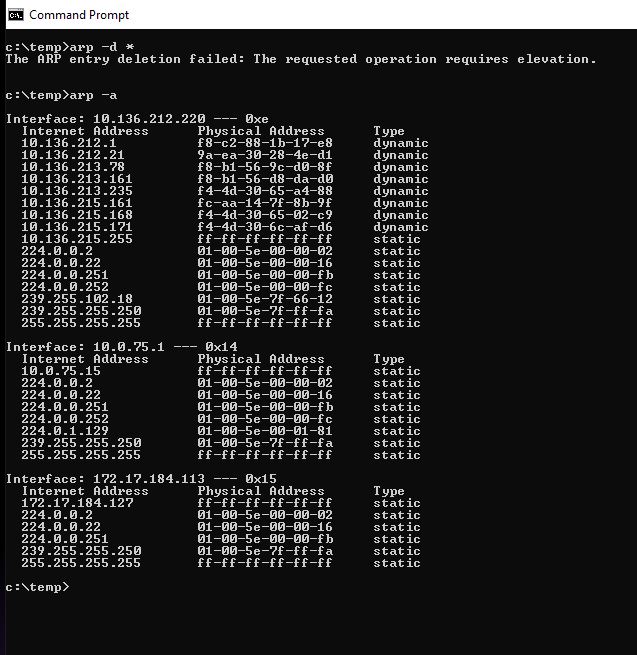
Question 8.
ARP stands for Address Resolution Protocol.
ARP takes IP addresses and translates / converts them into MAC addresses so data can get to the intended devices.
The command prompt arp -d* command was not allowed to work. Dr. Gx told me that this was probably only accessible to System Administrators.
Question 9.
The protocol used to translate the known Layer 3 address to an unknown Layer 2 address is ARP.
It’s required because Layer 2 operates with MAC address while Layer 3 operates with IP address.
Question 10.
Layer 3 Gateways are also called Routers.
The defacto standard for the logical / software / and network address used today is TCP/IP.
They would require 48 bits.
Question 11.
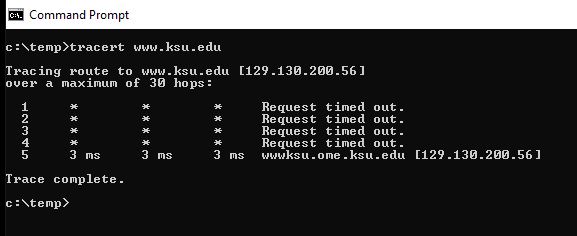
Using the command prompt and typing tracert http://www.ksu.edu had 5 hops.
Using the command prompt and typing tracert http://www.nus.edu.sg had 12 hops.
Question 12.
Dr. Gx demonstrated this for us. He connected two computers to a switch and used the switches operating system to show the MAC address for the computers connected to it.
Diagrams, flowcharts, and figures: N/A
https://searchnetworking.techtarget.com/answer/Who-created-the-OSI-model
http://tcpipguide.com/free/t_OSIReferenceModelLayerMnemonics.htm
https://www.pluralsight.com/blog/it-ops/networking-basics-tcp-udp-tcpip-osi-models
https://www.computerhope.com/jargon/c/csmacd.htm
https://www.lifewire.com/what-is-dhcp-2625848
http://standards-oui.ieee.org/oui.txt
https://dnsmadeeasy.com/support/what-is-dns/
https://www.lifewire.com/address-resolution-protocol-817941
Conclusions:
The material covered in this lab could be useful for those who are going to be working with IT / Networking and other related areas. Once I got into the command prompt questions it was good to be able to ask Dr. Gx questions since it was sort of confusing to look at the information and try to figure out what exactly I was looking at and what to look for.
Objectives:
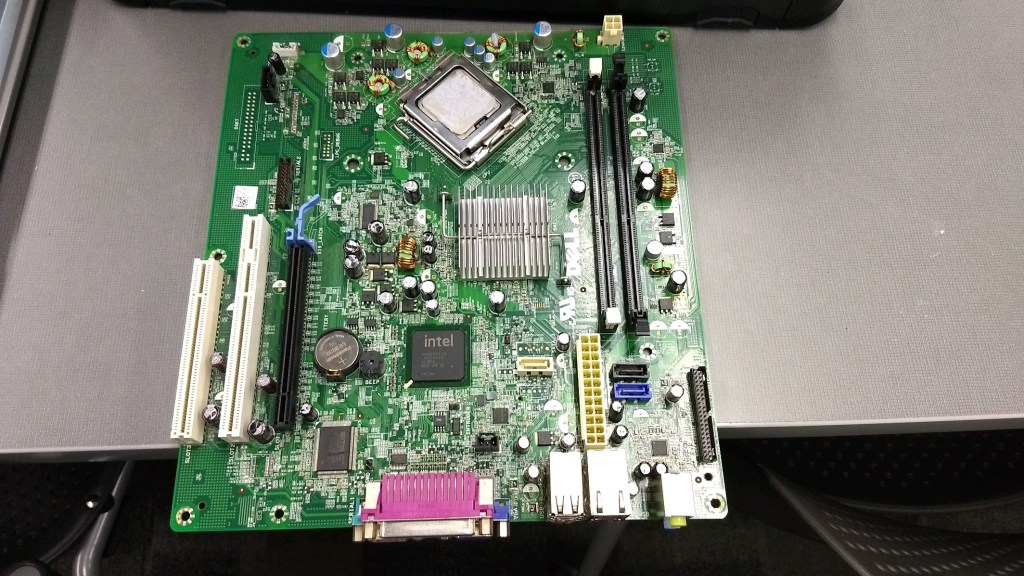
1. Examine the components of a desktop computer and try to disassemble and reassemble the computer.
2. Take a look at the historic computer items that Dr. Gx brought to class and do some research on other historical computers and devices. We must research at least 6 different historic computer and/or devices.
Equipment List: Desktop computer, phillips screwdriver.
Notes and Observations: Taking apart the desktop computer wasn’t too hard, but I was a bit paranoid about possibly damaging the components and cutting myself on sharp edges and corners. The power supply plug for the motherboard seemed stubborn compared to the other plugs and I thought at first that it might have been stuck or fused. Bailey helped me with it. During reassembly I had 2 issues:
1. I had trouble with installing the RAM on the motherboard. I was afraid of pressing too hard on it and I didn’t want to possibly force it in or cause damage. Bryce helped me with this.
2. I couldn’t remember where the plug-in was on the motherboard for the optical drive. Again, Bryce helped me with this too.
NOTE: This computer did not have a dedicated Video Graphics Card.
After the computer was put back together I plugged it in and hooked a monitor up to it and turned it on. It did turn on but nothing came up on the screen. Dr. Gx told me that it was not expected of us to make sure that they would work after reassembly and also there could be issues with them and might be inoperable anyway.


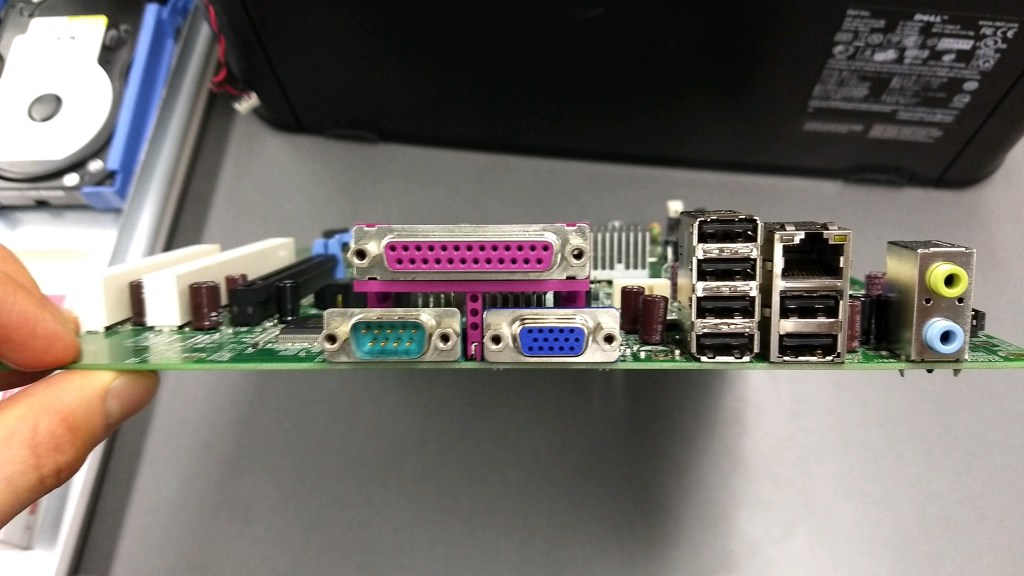

Question: How many and what type of I/O ports does the computer you examined have?
12 USB (2 on the front, 6 on the motherboard, 4 on an expansion card)
2 Audio Outputs (1 on the front, 1 on the motherboard)
2 Audio Inputs (1 on the front, 1 on the motherboard)
Ethernet
Display (VGA I think)
IO
Parallel
Question: What is the purpose of the CPU, the HDD, and the RAM memory?
The CPU does all the calculations on the computer.
The HDD stores the computers data and information for long term storage.
RAM loads the data and information that the computer is currently using.
Question: What does magnetic core memory look like? What is the purpose of magnetic core memory?
Magnetic core memory has copper strands that have “donuts” woven into them.
Magnetic core memory was basically the early form of RAM.
Historic Computers Research:
Cray 1 Super Computer
The Cray 1 Super Computer at it’s time was the fastest computer ever. It had a unique design that no other computers used that allowed for a special cooling system and concealed power supply units. It came at an extremely high cost though.
Luggable Computers
Luggable computers were the most portable form of a computer that you could get before laptops came out onto the market. They still often had build in screens, floppy drives, and included keyboards.
Apple II
The Apple II was Apple’s first computer that came assembled out of the box. Plus you could easily add additional components to it. This made it a more practical computer to own and use for a wider range of people.
Apple Lisa
The Apple Lisa was Apple’s first computer that had a Graphic User Interface, making it more user friendly than computers that used text based interfaces.
Altair 8800
Although the Altair 8800 was not as powerful and useful as many computers at the time, it was the first computer that was widely affordable and has been considered as the computer that really started the movement of people using computers for personal and home use.
Norden Bombsight
The Norden Bombsight was a cutting edge bomber plane sight used in World War II. It was treated as a very important and secretive item because of how sophisticated and effective it was.
Diagrams, flowcharts, and figures: N/A
References: Dr. Gx’s handout.
Conclusions: Taking apart a computer was rather easy. It’s when I tried to reassemble it that I began to have trouble. The biggest challenge was knowing where to plug in the different components to the motherboard. That’s not even factoring in if I put a brand new computer together and would have to assemble it with parts that I had never handled before and also have to deal with installing the operating system and drivers.
It was interesting to see the computer parts that Dr. Gx brought in for us to look at and research the various historical computers and devices. I’m old enough to remember the floppy disks. Everything else I either have never seen before or it was before I was alive.
Objectives:
1. Make a Cat5 Patch Cable.
2. Wire up a Patch Panel.
3. Take a quick look and handle a Thicknet / Thick Ethernet cable, a Thinnet / Thin Ethernet cable, and a Fiber Optic cable and then do some research on each type of cable and determine the pros and cons of each type of cable.
Equipment List:
Project 1, 3, and 4 – Dr. Gx’s handout, Cat5 Cables, RJ45 Terminals, RJ45 Crimping Tool, Patch Panels, RJ45 Jack, Punch-Down Tool, and Scissors.
Project 2 – Thicknet / Thick Ethernet cable, Thinnet / Thin Ethernet cable, Fiber Optic cable, and a search engine.
Notes and Observations: Making patch cables and wiring up patch panels for the first time was time consuming but was overall simple and easy to understand since Dr. Gx explained it to us before we tried it for ourselves and he also had some details on the handout. The only issue that me and my partner had was that our patch cable had 3 wires that didn’t work. I’m assuming that on one or both ends of the cable there were wires not cut evenly. On a limb , it’s possible that the patch cable could have been bad considering that we have no idea what each of those patch cables has been through before.
The pros and cons of the different cables.
Thinnet / Thin Ethernet.
Pros: It would be best used for plugging devices into wall jacks or routers and switches that are nearby because it’s pliable and flexible and it’s connections appear to be simple and straight forward. Work Area and Equipment Room Cabling.
Cons: It would be a lousy cable to use for long distances since it’s maximum length is very limited.
Thicknet / Thick Ethernet
Pros: It would make a good cable for longer distances inside large buildings and possibly between buildings if you could protect it from the outdoor elements. Horizontal and Vertical Cabling.
Cons: At best, it’s somewhat flexible or pliable, and the method of connecting to this cable could make it inconvenient to use for plugging devices directly to a network.
Fiber Optics
Pros: It had a very fast bandwidth and can be used for very long distances. It would be a good cable for when you need to run a cable anywhere that is very far away or for a location where there will be lots of traffic on a network or internet. Outside Wiring.
Cons: It can be very prone to damage and signal loss if it is bent or pinched. It could be unusable in cases where the cabling needs to be bent or curved a lot. It can also be expensive.
Diagrams, flowcharts, and figures: Table for Straight Through Cable, a top view of how the wires in the patch cable show be organized inside the RJ45 Terminal.
References: Dr. Gx’s handout
Websites:
https://www.tutorialspoint.com/thick-ethernet-vs-thin-ethernet
https://www.techwalla.com/articles/what-is-thicknet-and-thinnet
https://www.versatek.com/blog/cable-war-copper-vs-fiber/
https://www.sfcable.com/blog/fiber-optic-cables-vs-ethernet-cables-difference
Conclusions: It was good to go through the paces of making our own patch cables. It’s good to have done it first hand experience with it considering that Ethernet cables makes up most, if not all, of the network wiring inside most buildings. Wiring the patch panels and RJ45 Jacks was nice also since there’s not many other settings where I would have had a chance to do that with someone there to show us how to do it and help us with it. I honestly thought that wiring the patch panels was going to be harder than what it really was. It was interesting to see Ethernet cables that were used in the past and compare them to what we use today.
Objectives: To create a blog website and post a lab report.
Equipment list: A desktop computer and the website WordPress.com.
Notes and Observations: The process of creating the website was easy but I noticed how WordPress would try to trick you into paying for the website by placing the links for the free option for the website in places that were not as noticeable as the options where you would have to pay for it.
Diagrams, flowcharts, and figures: N/A
References: Dr. Gx’s handouts.
Conclusions: Creating a simple blog website using WordPress is quite easy. Adding new posts looks like it will be straight forward and easy to understand. Beyond plain text I can’t determine how hard it could become to use but I assume that for the typical user, adding content should be easy.
